Experimental Night Photography

Your Aviation (or Personal) Photos and discussion on Cameras & photography.

Experimental Night Photography

Postby BFMF » Wed Jan 14, 2009 9:58 pm

So tonight, I decided to mess around a little with the settings. It's been very foggy for a few days, and the lights seem to give it an interesting glow outside, so I wanted to see how it would turn out if I used my tri-pod, and took photos with the shutter open for a while.


This was taken at f/8, ISO 200, for 15 seconds. I tried a mixture of several other settings, but a lot of them were either too bright, too dark, or blurry.

Image


Here is another one at F/16, ISO 250, for 10 seconds. It's a little darker, but seems a little better quality

Image

What would have been the best way to improve them?

What do you think? Comments, suggestions, criticisms, ect are requested... ;D
Last edited by BFMF on Wed Jan 14, 2009 10:09 pm, edited 1 time in total.
BFMF
Colonel
Colonel
 
Posts: 16266
Joined: Mon Feb 25, 2002 6:06 pm
Location: Pacific Northwest

Re: Experimental Night Photography

Postby a1 » Wed Jan 14, 2009 11:51 pm

I like the first shot. Looks like you are enjoying. ;)
Image
790i : QX9650 : 4Gb DDR3 : GeForce 8800 GTX : 1 WD Raptor : 1 WD VelociRaptor 150
User avatar
a1
Lieutenant Colonel
Lieutenant Colonel
 
Posts: 7608
Joined: Thu Jan 04, 2007 9:16 pm

Re: Experimental Night Photography

Postby Rifleman » Thu Jan 15, 2009 12:21 am

In order to learn quicker, when you take various shots, only change one parameter at a time....
You can hold the others, for example , shoot at a fixed ISO and only change either the aperture or shutter speed, but not both. This way you can see the effect of shooting at different exposure values. One f stop at a time with increasing or decreasing changes is a way to bracket your images. Varying shutter speeds the same way, should net you the same result. For long exposure shots, use the timer function so that you won't be moving the camera by pressing the shutter release to take the picture.
Image
User avatar
Rifleman
Lieutenant Colonel
Lieutenant Colonel
 
Posts: 5684
Joined: Sat Oct 12, 2002 4:44 pm
Location: Tropical island in the Pacific

Re: Experimental Night Photography

Postby BigTruck » Thu Jan 15, 2009 1:27 am

Exactly what rifleman said, set up a tripod, set the timer, and then just play with the settings, one setting at a time.
Last edited by BigTruck on Thu Jan 15, 2009 1:30 am, edited 1 time in total.
Alienware X51_R2 (thank you wife) Windows 8.1, 6GB Ram, Intel Core i3-4150 CPU @3.50GHz
FSX Acceleration settings on max, no twitches or glitches.
Saitek X52 Stick and Throttle
User avatar
BigTruck
Global Moderator
Global Moderator
 
Posts: 7048
Joined: Wed Jun 20, 2007 2:35 pm
Location: Tuscaloosa, AL

Re: Experimental Night Photography

Postby expat » Thu Jan 15, 2009 4:50 am

For a first go, they are not bad at all. As Rifleman and Truck have already said, don't adjust too much at the same time. Give the following a try, it is what I do and it works for me more often than not. Set your camera to 200 ASA and auto for everything else. Let it take a meter reading from an area in the picture that is an average of the lighting. Not really a dark corner but not at a lit area. Note down the aperture and shutter speed, then double the shutter speed and see what sort of picture you get. After that, adjust the shutter speed progressively until you get what you are looking for. As I said this is what I do, others may have different ideas, but this works for me. Have fun :)

Matt
"A bit of a pickle" - British translation: A catastrophically bad situation with potentially fatal consequences.

PETA Image People Eating Tasty Animals.

B1 (Cat C) licenced engineer, Boeing 737NG 600/700/800/900 Airbus A318/19/20/21 and Dash8 Q-400
1. Captain, if the problem is not entered into the technical logbook.........then the aircraft does not have a problem.
2. And, if you have time to write the fault on a napkin and attach to it to the yoke.........you have time to write it in the tech log....see point 1.
User avatar
expat
Lieutenant Colonel
Lieutenant Colonel
 
Posts: 8679
Joined: Tue Apr 19, 2005 3:06 am
Location: Deep behind enemy lines....

Re: Experimental Night Photography

Postby Willit Run » Thu Jan 15, 2009 10:35 am

Nice job!!  I like the look of the second shot.
Image
User avatar
Willit Run
Major
Major
 
Posts: 3783
Joined: Fri Aug 26, 2005 11:38 pm
Location: Voorhees, New Jersey USA

Re: Experimental Night Photography

Postby BFMF » Thu Jan 15, 2009 12:52 pm

I was using my tripod, and then used the timer function after I noticed the camera moving a little from pushing the button. That could have been my problem with the first one, though I'm not completely sure.

But I wasn't going through the settings systematically. Mostly choosing random settings and taking the photo. But one of these nights, I'll take your advice and take photos, changing one setting at a time.

Set your camera to 200 ASA and auto for everything else


Is that ISO, or another setting...? :-?
BFMF
Colonel
Colonel
 
Posts: 16266
Joined: Mon Feb 25, 2002 6:06 pm
Location: Pacific Northwest

Re: Experimental Night Photography

Postby Omag 2.0 » Thu Jan 15, 2009 1:32 pm

ASA is old people talk for ISO... lol...

In order to avoid movement of the camera, use the timer function or a remote controller. Also try the mirror lock-up mode. You won't be able to see trough the viewfinder, as the mirror will have clapped down, so only use this setting after you have made your composition. the clapping down of the mirror can cause movement of the camera and this setting avoids that.

Also, keep in mind that not every tri-pod is as stable as the next one. Budget tri-pods will be less stable than the high-end ones, so wind might be a problem in some cases...

Keep experimenting, change iso-values, shuttertimes, etc. You'll soon understand what brings the best results...
[center]
Image

Check my aviation-photo's at www.airliners.be

Or go straight to Omag's Album[/cent
User avatar
Omag 2.0
Lieutenant Colonel
Lieutenant Colonel
 
Posts: 9490
Joined: Tue Aug 05, 2003 6:43 am
Location: Somewhere, Belgium

Re: Experimental Night Photography

Postby beaky » Thu Jan 15, 2009 10:38 pm

The second one needs nothing... I like the dark foreground, the silhouettes of the utility poles, etc. and eerie light in the background. Nice shot!
Image
User avatar
beaky
Global Moderator
Global Moderator
 
Posts: 12877
Joined: Thu Dec 16, 2004 8:00 am
Location: Shenandoah, PA USA

Re: Experimental Night Photography

Postby Jeff.Guo » Fri Jan 16, 2009 12:10 am

Your second shot is actually excellent :)

Night shots are pretty hard to take in my opinion... gotta have steady hands and typical metering methods don't apply. Your second shot is nearly perfectly composed/exposed...my only problem with that is the horizon is slightly off level, and things like that bug the hell out of me... :P

I would, however, recommend shorter shutter times though. 15 seconds is about 13 seconds longer than what it needs to be. Unless your tripod is anchored to the ground, any swaying motion from the wind or rotation of the earth will put motion blur on your photo. Plus, when you get up to those exposure times, its no longer half or double anymore, and the actual exposure effect is not nearly as significant as you would expect.

...and you can usually get away with higher ISOs (good lord, I don't think I have actually met anyone born in this century who actually uses "ASA"..), wider apertures, and underexposed negatives/shots with night photography if done correctly.
Jeff.Guo
2nd Lieutenant
2nd Lieutenant
 
Posts: 273
Joined: Tue Jul 29, 2008 9:30 pm

Re: Experimental Night Photography

Postby Rifleman » Fri Jan 16, 2009 12:32 am

...........(good lord, I don't think I have actually met anyone born in this century who actually uses "ASA"..........

That would only include up to an 8 yr old...this century has only been going for 8 yrs......... ;)
Image
User avatar
Rifleman
Lieutenant Colonel
Lieutenant Colonel
 
Posts: 5684
Joined: Sat Oct 12, 2002 4:44 pm
Location: Tropical island in the Pacific

Re: Experimental Night Photography

Postby BFMF » Fri Jan 16, 2009 12:35 am

I was trying to be so careful to not move the camera, that I was carefull to not breathe on the camera while the shutter was open...lol

I was trying to capture the effect of the vehicle lights, otherwise I probably wouldn't have used such a long exposure. But I'll do a little more experimenting and see what would happen
Last edited by BFMF on Fri Jan 16, 2009 12:36 am, edited 1 time in total.
BFMF
Colonel
Colonel
 
Posts: 16266
Joined: Mon Feb 25, 2002 6:06 pm
Location: Pacific Northwest

Re: Experimental Night Photography

Postby Jeff.Guo » Fri Jan 16, 2009 12:45 am

That would only include up to an 8 yr old...this century has only been going for 8 yrs......... ;)


Touch
Jeff.Guo
2nd Lieutenant
2nd Lieutenant
 
Posts: 273
Joined: Tue Jul 29, 2008 9:30 pm

Re: Experimental Night Photography

Postby BFMF » Fri Jan 16, 2009 1:15 am

I spent some more time out on my balcony this evening, and set the camera to a specific ISO, and shutter speed, and took pictures while slowly adjusting the aperture in increments. At F3.5, ISO 400, and ten seconds, the lights were bright and washed out. As I slowly increased the aperture value, the photos gradually became darker and darker
BFMF
Colonel
Colonel
 
Posts: 16266
Joined: Mon Feb 25, 2002 6:06 pm
Location: Pacific Northwest

Re: Experimental Night Photography

Postby Jeff.Guo » Fri Jan 16, 2009 1:16 am

I don't do night photography with the digital too often, mostly because its a hassle with me and my camera...

...but these two, that I found on my computer are probably from 2 months back. I think I was too lazy to walk the half mile back to my place, so I waited for the bus (on a side note, I have NEVER had to pay for the bus...whether it be a "borrowed" bus pass or the bus driver just likes me, but never spent a penny on the bus... ;D)...and if I remember correctly, I got bored, so started to play with the camera...


Both were taken on a hand held Sony Cybershot...

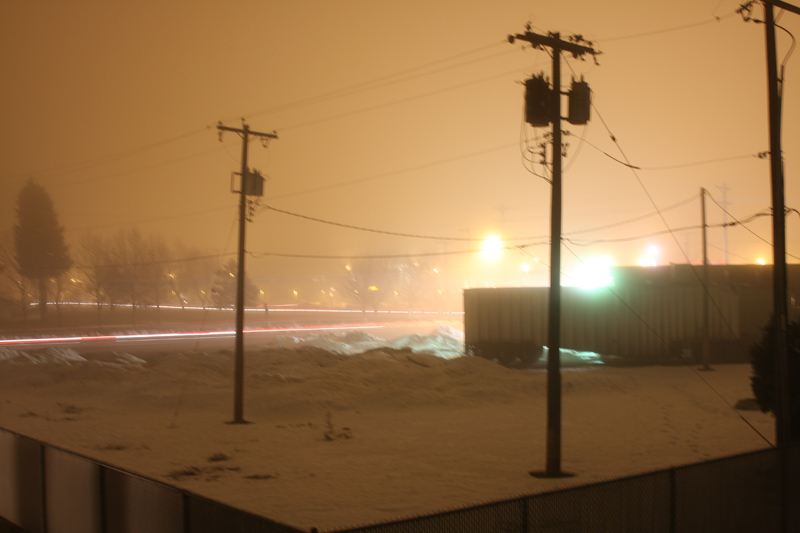
The first one was taken with a lower ISO, smaller aperture, and longer shutter time...but because I tilted the camera up just that tiny bit, for probably less than a quarter of a second (as you can tell by the curve in the head/tail lights) the shot when to hell...

Image

...and the 2nd one, with higher ISO and wider aperture, which in theory should produce a less detailed and less focused image is much better...
Image

There is virtually no difference in pixel grain size (unless you focus on the street lamp)...and the zone of focus is well beyond acceptable (extends from beyond my knee to well past the building).

Just play around with it, and keep in mind what is best on paper/theory doesn't necessarily mean the best in practice.
Last edited by Jeff.Guo on Fri Jan 16, 2009 1:22 am, edited 1 time in total.
Jeff.Guo
2nd Lieutenant
2nd Lieutenant
 
Posts: 273
Joined: Tue Jul 29, 2008 9:30 pm

Next

Return to Photos & Cameras

Who is online

Users browsing this forum: No registered users and 103 guests