My First attempt at edited a shot

Let loose your artistic flair! No Rules except please keep shots within 380K & 2000 pixels wide.

My First attempt at edited a shot

Postby firemonte007 » Mon Oct 15, 2007 8:40 pm

here is my first attempt at changing a screen shot
Image
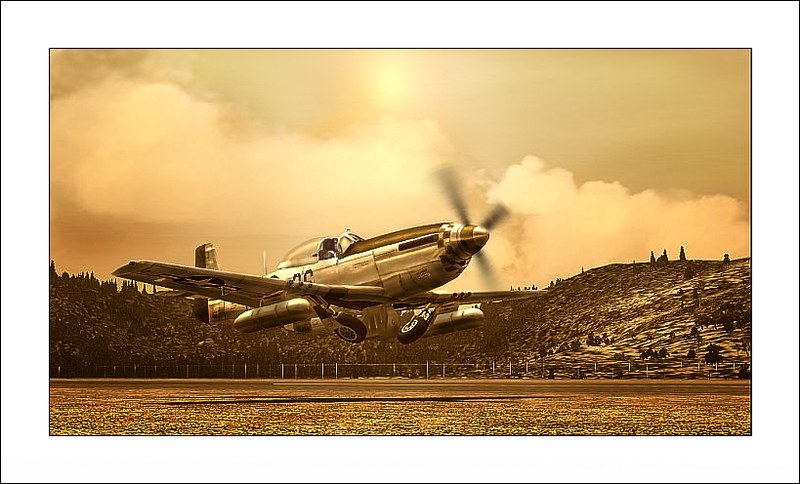
C&C welcome....wondering how to make edited shots look like photos.
Thanks for looking
Jason
Image
User avatar
firemonte007
Major
Major
 
Posts: 2288
Joined: Mon Aug 20, 2007 8:24 pm
Location: northern IL, USA

Re: My First attempt at edited a shot

Postby evanatorx » Mon Oct 15, 2007 9:31 pm

never mind the editing, those graphics are mint!
User avatar
evanatorx
Captain
Captain
 
Posts: 511
Joined: Wed Oct 03, 2007 7:44 pm

Re: My First attempt at edited a shot

Postby jnc1 » Tue Oct 16, 2007 12:00 pm

Lovely effect -

Only real comment is maybe you could crop it a little harder, mainly the forground, quite a lot of nothing there.

As for making it look like a photo - well it takes time mainly. Find as many pictures of the real a/c as you can, decide on which parts catch the light and where your light is coming from. Then use a mixture of re painting, dodging/burning to bring it to life. Mainly add any painting on a new layer so you can adjust it if needed.

I don't like to touch other peoples shots to shows what i mean - but if you would like me to edit it and explain what I do, I would be happy to help

John
Last edited by jnc1 on Tue Oct 16, 2007 12:29 pm, edited 1 time in total.
Visit my site - www.screenshotworld.com
jnc1
2nd Lieutenant
2nd Lieutenant
 
Posts: 250
Joined: Mon Aug 27, 2007 6:21 pm
Location: UK

Re: My First attempt at edited a shot

Postby DaveT » Tue Oct 16, 2007 3:21 pm

that is a very sweet shot/edit jason................... ;)

Dave ;)
User avatar
DaveT
Major
Major
 
Posts: 2260
Joined: Thu Jan 31, 2002 7:46 pm
Location: KGSO

Re: My First attempt at edited a shot

Postby firemonte007 » Tue Oct 16, 2007 3:30 pm

Lovely effect -

Only real comment is maybe you could crop it a little harder, mainly the forground, quite a lot of nothing there.

As for making it look like a photo - well it takes time mainly. Find as many pictures of the real a/c as you can, decide on which parts catch the light and where your light is coming from. Then use a mixture of re painting, dodging/burning to bring it to life. Mainly add any painting on a new layer so you can adjust it if needed.

I don't like to touch other peoples shots to shows what i mean - but if you would like me to edit it and explain what I do, I would be happy to help

I think it would me cool to see what could be done with this shot by someone with more expericance than me, that way i can see what can be done 8-)

Thanks for the compliments... the unedited shots are under "famous Mustang" in the freeware pics section
John


I think it would me cool to see what could be done with this shot by someone with more expericance than me, that way i can see what can be done  

Thanks for the compliments... the unedited shots are under "famous Mustang" in the freeware pics section
Last edited by firemonte007 on Tue Oct 16, 2007 3:34 pm, edited 1 time in total.
Image
User avatar
firemonte007
Major
Major
 
Posts: 2288
Joined: Mon Aug 20, 2007 8:24 pm
Location: northern IL, USA

Re: My First attempt at edited a shot

Postby jnc1 » Wed Oct 17, 2007 1:00 pm

Jason,

I spent a little time on it. I hope it is to your liking. This is what I did.

1. As mentioned before I cropped it tighter.
2. I used photoshop image adjustments (mainly contrast) to deepen the tones on the whole picture.
3. I used the Burn tool on a low (6-8%) setting to shade under the wings, fuselage, drop tanks and a few places on the fuselage. The spinner got a little time spent on it as it's a focal point.
4. Used the dodge tool, again on a low setting with a 2-3 pixel soft edged brush. This was to add highlights to the spinner, fuselage, drop tanks. Again the spinner got most time spent on it.
5. 6 pixel brush. Dodge on 8% to highlight the canopy.
6. Paintbrush on 1 pixel, 6% black colour - drew in the panel lines. Then sampled the fuselage colour and on a new layer painted some detail.
7. Paintbrush on 1 pixel 6% white colour - highlighted the panel lines.
8. Took a screenshot of a still P51 prop from the same angle, cut it out, scaled it, then used a radial blur tool to give the effect.
9 Lastly used the Render lighting tool with an omni light to put the sun into the picture (position slightly wrong..Grrr)

Oh well, this is what it looks like

Image
Visit my site - www.screenshotworld.com
jnc1
2nd Lieutenant
2nd Lieutenant
 
Posts: 250
Joined: Mon Aug 27, 2007 6:21 pm
Location: UK

Re: My First attempt at edited a shot

Postby firemonte007 » Wed Oct 17, 2007 3:27 pm

:o :o :o holy cow what a differance that makes :o That looks awesome....and man i have alot to learn lol
thanks for show what can be done. 8-)
Jason
Image
User avatar
firemonte007
Major
Major
 
Posts: 2288
Joined: Mon Aug 20, 2007 8:24 pm
Location: northern IL, USA

Re: My First attempt at edited a shot

Postby jnc1 » Wed Oct 17, 2007 4:18 pm

I hope it's helped give you an idea how to get started.

Your screenshot of the P51 was really great, the wheels retracting, low level - Lovely!

I hope you enjoy making more edited shots, it's a whole load of fun.

With screenshots like the one you took of the Mustang you won't have any problems making stunning pictures.

John
Last edited by jnc1 on Wed Oct 17, 2007 4:29 pm, edited 1 time in total.
Visit my site - www.screenshotworld.com
jnc1
2nd Lieutenant
2nd Lieutenant
 
Posts: 250
Joined: Mon Aug 27, 2007 6:21 pm
Location: UK


Return to Edited Screenshots

Who is online

Users browsing this forum: No registered users and 591 guests