First simpit: part 2 (ch-ch-changes!)

Only for Genuine FS fanatics! Taking this hobby from Real to Surreal? Or maybe just combining 4 hobbies into 1 ;)

First simpit: part 2 (ch-ch-changes!)

Postby beaky » Fri Sep 15, 2006 2:46 pm

Naturally, as soon as I got my mitts on all that aluminum, everything changed...

The curve of the frame suggested the right shape for a sort of "half panel"... in retrospect, i wish I hadn't cut it, because Ive changed my mind again.
But it's all good: I can re-join that without much fuss.


Image


An early idea... stood on end, the cap is more than tall enough. I started with this "clamshell"  idea initially, but nixed that as well...
That wood you see is a support leg for my sleeping/home theater loft; one design parameter is that htis thing must fit between two support legs, under the loft.


Image


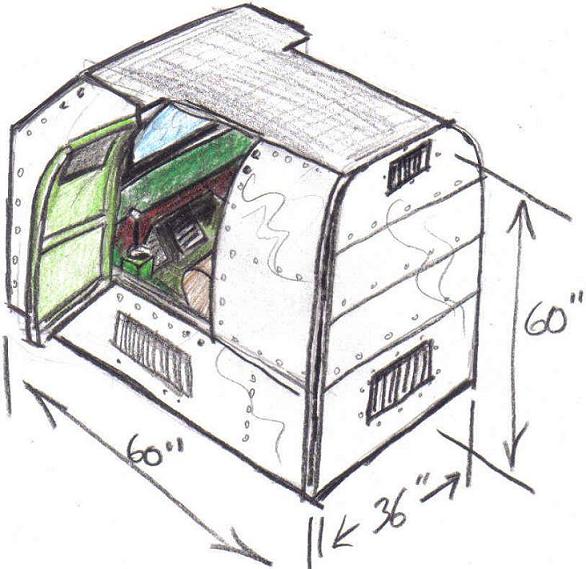
Here's a sketch of what I think I will actually make, based on the parts available mated with a plywood box for the nose. To make it work with the cap pieces, I'll have to make the overhead out of wood, also.
The plywood will probably be skinned in Masonite, fake rivet-heads added here and there, and painted gloss aluminum. Some areas will get whatever spare sheet I have, for real and fake access panels, etc. I'll add a few grilles so I don't suffocate in there; maybe some fans at some point.
There will likely be a couple of windows, glazed with some cool translucent smoke-finish plastic I found. It's very bendable, so I'll be able to glaze the curve near the roof line. This will allow just a little ambient light inside  and create the illusion of proper windows, but I won't be able to make out what's outside, so it won't spoil the "immersion effect".

The point of the built-up nose is partly to allow me to later put aone or two-mirror projection setup... if I can find a decent used DLP projection TV, I'll just hack that and cram it in there, or rebuild the nose if necessary to accomodate that. for now I'll be happy enough with a 20" widescreen LCD, which I'll be ordering soon, along with the rest of the parts for the new rig. the new PC, BTW, will live outside the sim enclosure... with a KVM switch, I'll be able to control it from my existing workstation when needed.

This whole thing will be made so that it breaks down fairly easily: the top of the nose will come off so I can work behind the panel, and the entire nose will separate from the aluminum part.

I've been going blind looking at flight deck/cockpit photos, and have decided the interior colors will be zinc chromate-looking light green on all interior aluminum (no, I don't want to strip and actually chromate the sheet); dark ("army") green for all platforms, housings, etc. ; the panel will be dark green or black, with a strip of wood on the bottom part (probably stained dark red). Might put some dark red carpet on the floor near the pedals... we'll see. First I have to at least get the simulator core built  and running.

Image

Well, now that I've revealed my mad scheme, I'll have to follow through and finish this thing. No idea how long it will take, but here's the plan:
1: Mount the pedals and seat on a (2-part) deck and paint them
2: Build main sim box
3: Add side boxes near seat, quadrant housing, etc.
4:Final panel layout and fabrication
5: Add electronics/ mechanicals
6: Test, tweak, mod
7: Build enclosure
Next: part 3- building
Last edited by beaky on Fri Sep 15, 2006 2:49 pm, edited 1 time in total.
Image
User avatar
beaky
Global Moderator
Global Moderator
 
Posts: 12877
Joined: Thu Dec 16, 2004 8:00 am
Location: Shenandoah, PA USA

Re: First simpit: part 2 (ch-ch-changes!)

Postby Fly2e » Fri Sep 15, 2006 3:24 pm

Both you and me seem to be quite busy ehh Sean?  ;)
COMING SOON!
User avatar
Fly2e
Colonel
Colonel
 
Posts: 198020
Joined: Thu Jan 17, 2002 5:29 pm
Location: KFRG

Re: First simpit: part 2 (ch-ch-changes!)

Postby beaky » Fri Sep 15, 2006 5:11 pm

Both you and me seem to be quite busy ehh Sean?  ;)


Think there's a pill or something for this? Electroshock, maybe? ;D

Already noticing that because I'm excited about this project, I'm getting other little things done, too. Should be a productive weekend...
Image
User avatar
beaky
Global Moderator
Global Moderator
 
Posts: 12877
Joined: Thu Dec 16, 2004 8:00 am
Location: Shenandoah, PA USA

Re: First simpit: part 2 (ch-ch-changes!)

Postby JBaymore » Sat Sep 16, 2006 9:33 am

Rottydaddy,

Good to have another "crazy" diving into this absurdity head first.  ;)  Makes me feel a litte more sane.

Nice stuff happening there.  And nice demo of "scrounging" design work too.  Shows it doesn't HAVE to cost and arm and a leg.... you can usually get it down to only the leg up to the knee.  :)

Voice of experience...... you FOR SURE want fans of some sort.  All that electronics packed in there creates heat.  Every little light bulb is a little heater.  Not to mention body heat accumulating.  It all adds up fast....particularly in the summer.  

I have my real cockpit vent power (12VDC) run through one set of poles (the other set is for sending cockpit controls IN the sim) on a number of double pole switches.  The switches form a simple set of "AND" gates on the overhead panel.  The power comes through (among other paths) the left and right "packs" switches that then goes to the cabin "recirc" switches and then to the individual fan controls.

If at least one engine or the APU aren't running, the packs don't work...... if the packs aren't on........ and so on.  Add some nice realism,..... and provides a NEEDED function that is very real, even in a simpit.  

When I hit the lottery,......... it'll get a REAL AC pack  ;).


Keep up the good work..... and keep posting pictures here.


best,

......................john
Image ImageIntel i7 960 quad 3.2G LGA 1366, Asus P6X58D Premium, 750W Corsair, 6 gig 1600 DDR3, Spinpoint 1TB 720
User avatar
JBaymore
Global Moderator
Global Moderator
 
Posts: 10020
Joined: Sat May 24, 2003 9:15 am
Location: New Hampshire

Re: First simpit: part 2 (ch-ch-changes!)

Postby beaky » Sat Sep 16, 2006 2:01 pm

I will definitely actively ventilate the nose section; that should keep the heat from the display, panel lights, etc. out of my face.
But for Phase 1, at least, there won't be a lot of heat-producing stuff in there, mostly switches connected to joystick boards (and probably at least one multichannel USB board; my switch count keeps growing as I try to eliminate keyboard use).
May have to add some low-voltage power, but for now I'm just going to have a lpowered USB hub, and a120V strip in there for fans and cockpit lights that will operate independently from the computer; that sort of thing.
Image
User avatar
beaky
Global Moderator
Global Moderator
 
Posts: 12877
Joined: Thu Dec 16, 2004 8:00 am
Location: Shenandoah, PA USA


Return to Home Cockpits and Setups

Who is online

Users browsing this forum: No registered users and 70 guests