Saitek Knob Mods

Graphics Cards, Sound Cards, Joysticks, Computers, etc. Ask or advise here!

Saitek Knob Mods

Postby OldAirmail » Fri Feb 22, 2013 10:33 pm

Here's a very simple mod to replace the radio knobs on the left side of the Saitek Radio Panel.

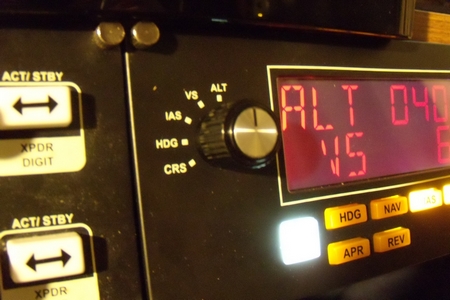
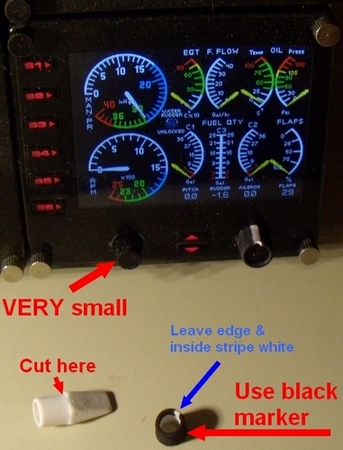
The original knobs are a bit small, and many people complain about how hard it is to turn them. I don’t think that they’re all that hard to turn, but the solution is very cheap and simple.

Image

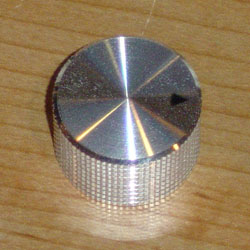
The knobs that I’ve used came from Radio Shack. They’re 1 inch in diameter and nicely knurled on the side. The knob is made to sit on a quarter inch post.


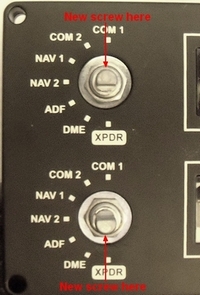
There’s a setscrew in the knob that will attach it to the post. This screw is going to be on the opposite side of the post from the flattened side of that post. That’s not a problem. Mine have been on for about a year and haven’t given me any problems.

Image

Turn the little black knobs so that the indicators are facing each other. A knife blade under both sides of the knob may be needed to help you remove the old knob.

(NOTICE: If you don’t wear full chainmail and shatterproof eye protection when you do this I refuse to be held responsible for any self mutilation caused by your ineptitude.)

Image . Image There are 2 in the bag, Part Number - Model: 274-424

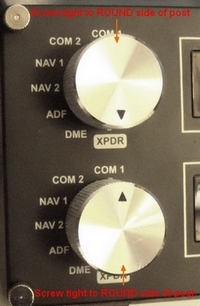
When you place the Radio Shack knobs on with the indicators pointing towards each other the setscrews will be facing the outside edges. This will make it easier to tighten the screws.

The first time that you tighten the screws DO NOT over tighten them. If you do, the screws will leave a small indent on the shaft. If you then decide to move the knob a little one way or the other, the screw will drift toward the indent. Turn the knobs and make sure that they line up the way that you want them to.

If everything looks correct then you can tighten them. BUT, again, DO NOT over tighten the screws. Tight, but not so tight as to damage anything is what you want. The new knobs should feel tight and secure.


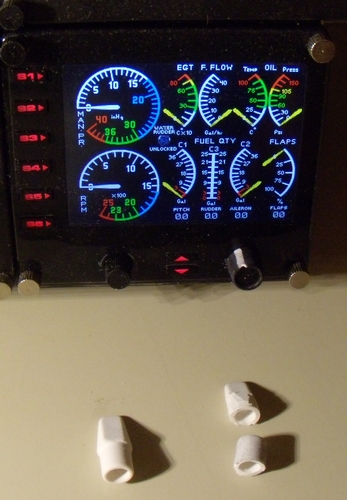
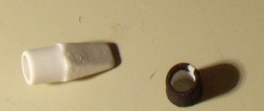
The same thing can be done with the left side knob on the Saitek Multi Panel. I choose a different style knob just for some variety. This knob is about 3/4 inch in diameter. I can't find the part number online.

Image . . This was the original knob. Image

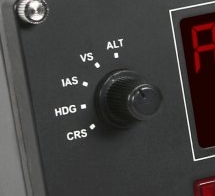
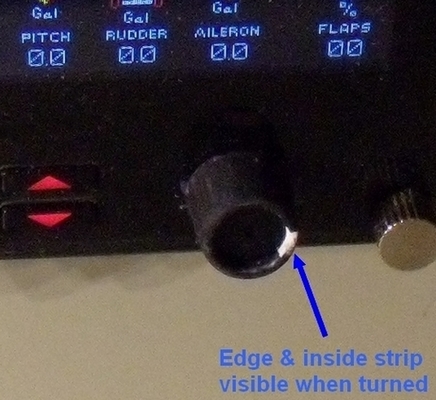
The knob above was a little to long. By placing the knob on the face of the panel I could see that the setscrew would contact the top of the post. The inside of the bottom of the knob is hollow. Rubbing the bottom against a flat file, or some sandpaper, will remove enough for the screw to make full contact with the post.


These knobs are very cheap, about $3.00 - $4.00. Better ones can be found online. Alternately; you could try to find an electronic hobby store. Their selection will probably be much better than Radio Shack.
Last edited by OldAirmail on Sat Mar 16, 2013 10:43 am, edited 3 times in total.
.. .
Get the most out of your controls - SPAD.neXt

Image
. . . . . .Any time, any plane, any weather.
. . . . . . . . . . . . . Prepar3d V4
User avatar
OldAirmail
Major
Major
 
Posts: 4814
Joined: Sun Feb 17, 2013 3:06 pm
Location: Concrete, WA ICAO - 3W5

Re: Saitek Knob Mods

Postby OldAirmail » Fri Feb 22, 2013 10:49 pm

I just found a VERY good source of replacement knobs for anyone who wants to get fancy.

Digi-Key

The search for "knobs" produced 1,092 results. The measurements are in inches and millimetres.

Better yet, they're available all over the world
Last edited by OldAirmail on Mon Mar 11, 2013 7:03 pm, edited 2 times in total.
.. .
Get the most out of your controls - SPAD.neXt

Image
. . . . . .Any time, any plane, any weather.
. . . . . . . . . . . . . Prepar3d V4
User avatar
OldAirmail
Major
Major
 
Posts: 4814
Joined: Sun Feb 17, 2013 3:06 pm
Location: Concrete, WA ICAO - 3W5

Re: Saitek Knob Mods

Postby OldAirmail » Thu Feb 28, 2013 10:23 pm

Fun with an eraser.

As much as I think that the Saitek FIP is overpriced, I do like it. But it can be made a little bit better.

At the bottom of the FIP are 2 small knobs. Aside from being very small, they’re easy to overlook. And while not hard to turn, they have no “heft”. No feel of substance, so to speak. When you reach out to turn them it’s like grabbing a pea. Small. Insignificant.

They do have uses, but are easily overlooked. And by not noticing them, they are forgotten.

So we start with a replacement eraser for a pencil. Off with its head!!!
Image

Then color it black with a permanent black marker. But leave a stripe uncolored both on the outside and the inside. Set it aside and let the marker coloring dry.
Image

The inside stripe will show when the outside stripe is turned away from you. The eraser tips will be a dull black against the gloss of the FIP and give an easy soft grip to the knobs.
Image . Image
Last edited by OldAirmail on Thu Feb 28, 2013 10:32 pm, edited 1 time in total.
.. .
Get the most out of your controls - SPAD.neXt

Image
. . . . . .Any time, any plane, any weather.
. . . . . . . . . . . . . Prepar3d V4
User avatar
OldAirmail
Major
Major
 
Posts: 4814
Joined: Sun Feb 17, 2013 3:06 pm
Location: Concrete, WA ICAO - 3W5

Re: Saitek Knob Mods

Postby OldAirmail » Mon Mar 11, 2013 7:09 pm

Lost pictures restored.
User avatar
OldAirmail
Major
Major
 
Posts: 4814
Joined: Sun Feb 17, 2013 3:06 pm
Location: Concrete, WA ICAO - 3W5


Return to Hardware

Who is online

Users browsing this forum: No registered users and 286 guests