Re: The poor mans sim pit
I'm having a blast with my extra Switch panel.
I now have a ton of buttons and a lot of possibilities. Learning the commands and how to use them is great.
FSX/Prepar3d can only "see" the switch panel as a Saitek Switch Panel. Using ONLY the Saitek driver/software, you can't make any changes.
And that's where SPAD and FSUIPC come in.
FSUIPC can control just about everything in FSX/P3d. BUT it can't "see" the Saitek panels.
SPAD, on the other hand, was created to operate the Saitek Pro Flight panels MUCH better than the Saitek software.
If that was all there was to it, this would be a very short story.
But the creator of SPAD also added the ability to capture the input from the Saitek Pro Flight panels, and send them to FSUIPC as if they were joystick buttons.
I won't go into all the details, but it's quite flexible in the ways that you can use it.
This is the main SPAD control panel. It'll list any Pro Flight control panels that you have plugged in. It will not list the small instrument panels.
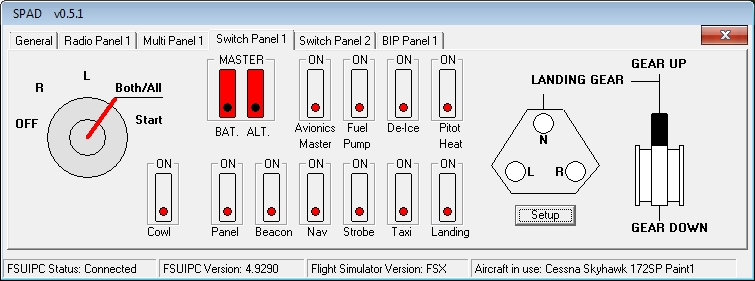
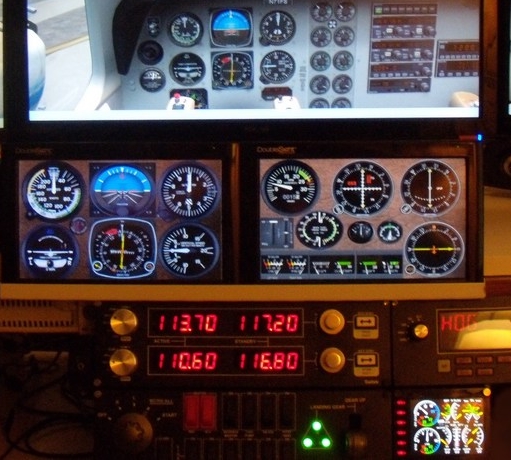
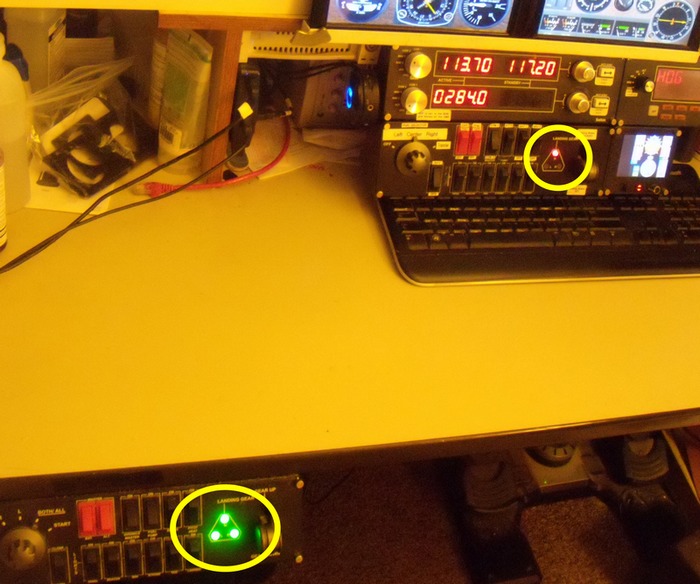
As you can see I have two Switch Panels - switch panel 1 & 2. The original switch panel is back in its' place underneath the radio panel.
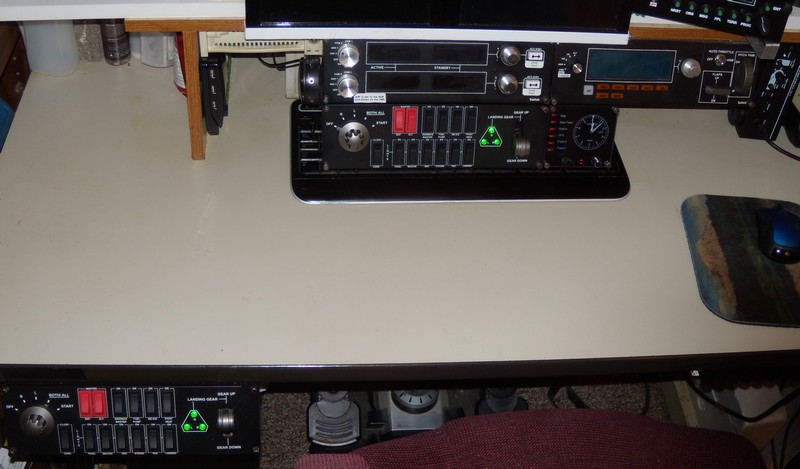
The new switch panel (Switch Panel 2) is now on the edge of the desktop and to the left of where the yoke would normally be. That one behaves entirely normal.
The one under the Radio panel has all the switches set to "No Event". You move a switch & nothing will happen. At least until I program it.
To program any of the switches is extremely easy. In fact, it can hardly be called "programming". It's more like "select this or that".
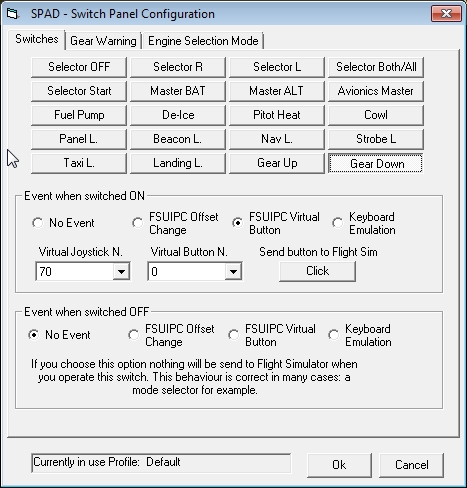
Click on the panel tab, Switch Panel 1 and then the SPAD Setup button. This'll pop up.
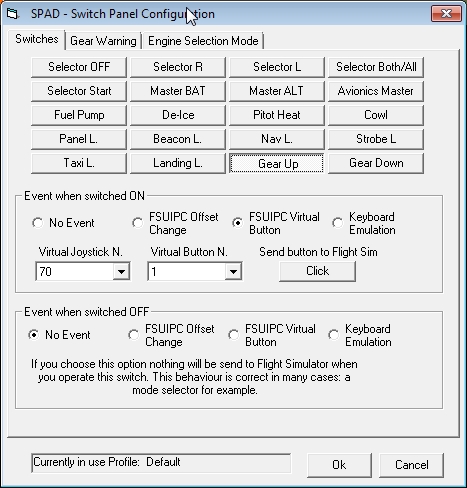
In this case I've already selected the Gear UP button.
I then select FSUIPC Virtual Button to create a virtual joystick & button. Again, I've already assigned a virtual joystick/button to it - 70 & 1.
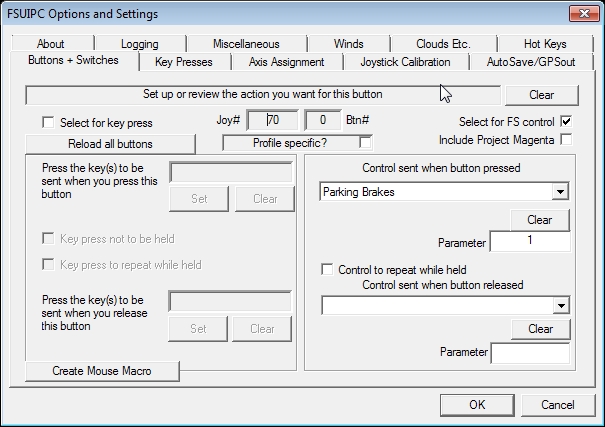
NEXT you have to open FSUIPC. Go to the Buttons + Switches tab.

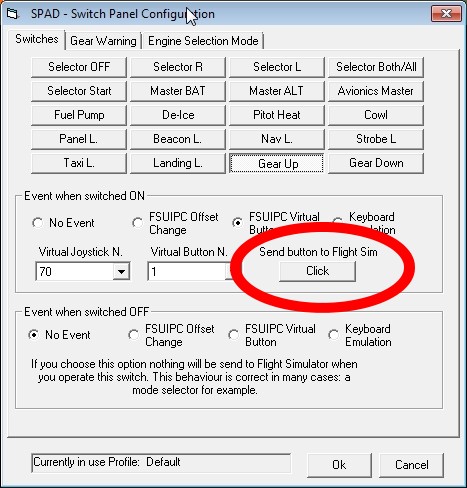
Then back again to SPAD Configuration. When you click on the Send button to Flight Sim it'll be intercepted by FSUIPC. You can now click OK on the SPAD screen. You're done for the moment.
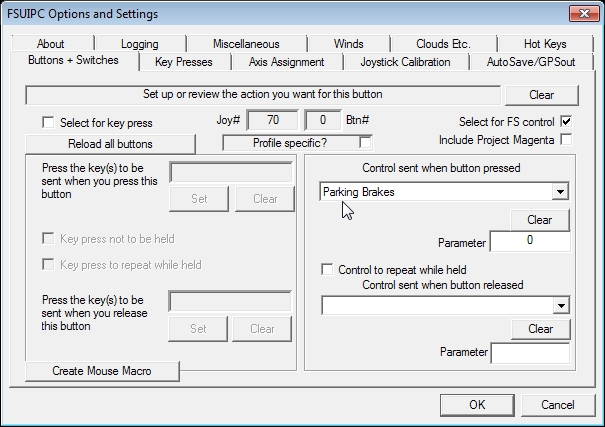
As soon as you hit the Click button above, the virtual joystick & virtual button will show up in FSUIPC.
After that, all you have to do now is decide just what the button will do. In this case I selected to use a FS control called Brakes. You can safely ignore Parameters for now.
That wasn't all that hard was it?
FSX and Prepar3d treats the command Brakes as a toggle.
Toggles will normally work with two presses. One to set it, and press it again to unset it. This is important because when I lift the lever upwards I want it to toggle the brake off.
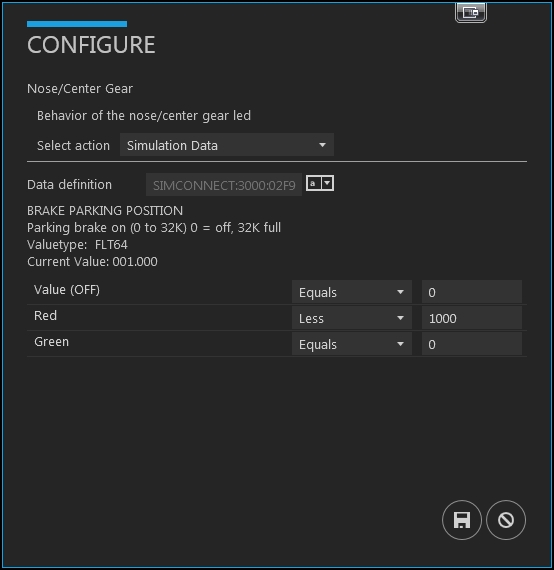
I want to activate the parking brake by pulling the lever down. FSUIPC used the FSX internal command Parking Brakes to set the parking brake. The command Brakes will release the parking brakes.
This is the setup for setting the parking brakes.
The reason that I have it this way is because FSX will sometimes set Brakes or Differential Brakes when I use the Saitek rudder. So far this has never happened with P3d.
By cycling through the brake lever, it'll clear the situation.
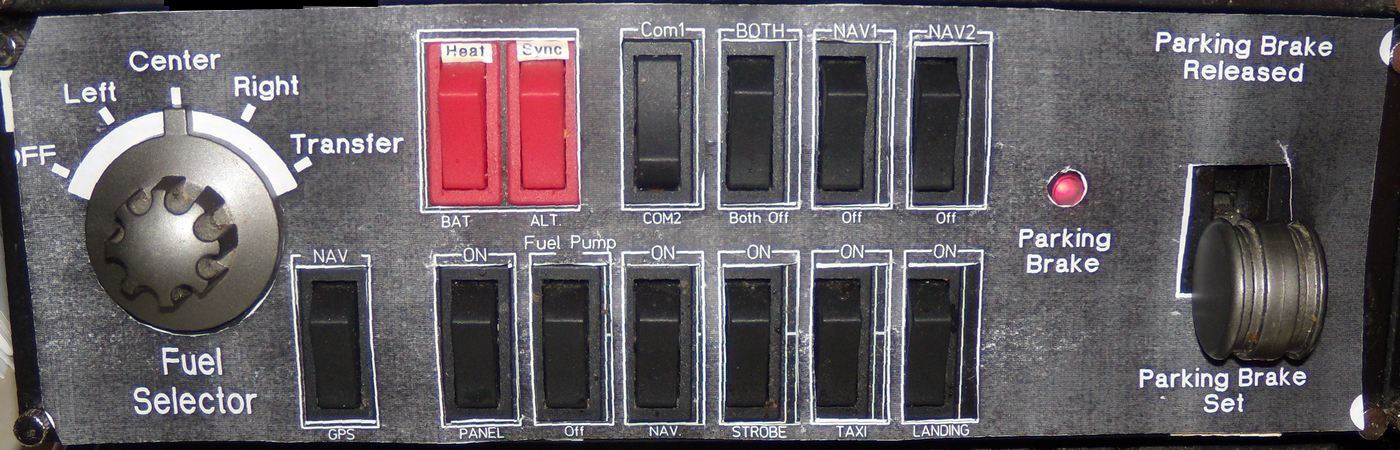
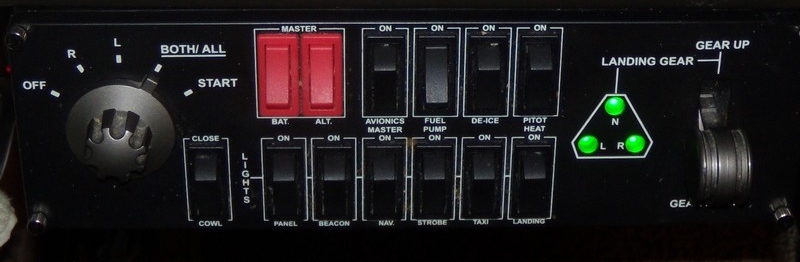
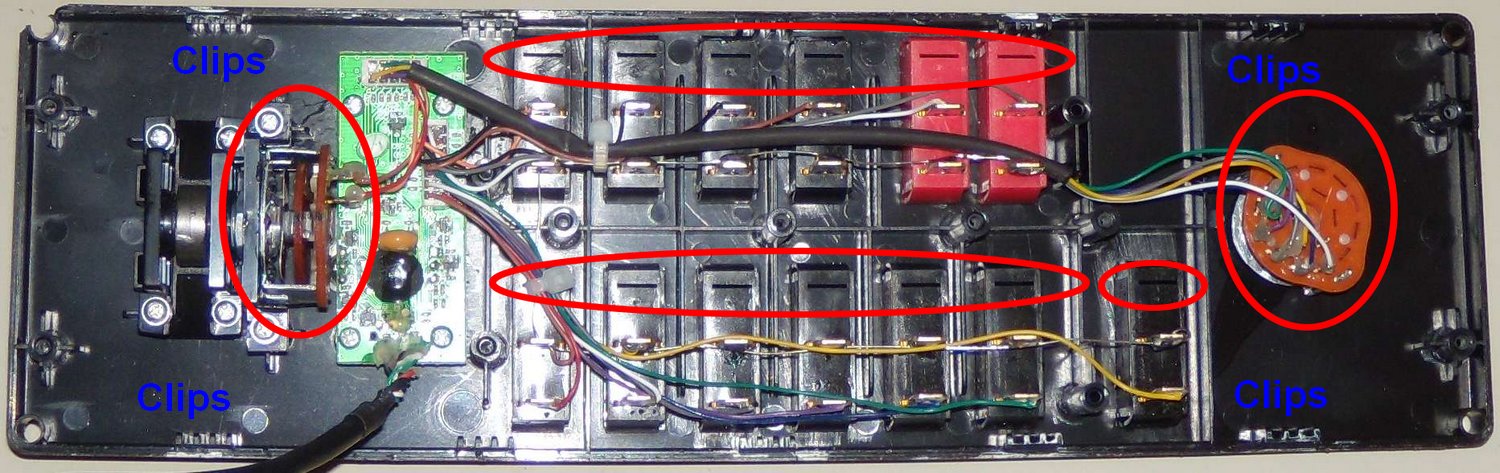
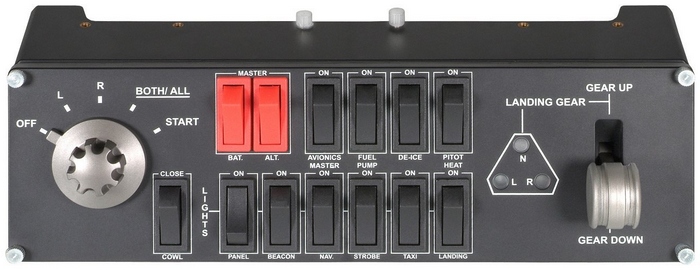
Later I'll create an overlay to cover the text on the face of Switch Panel 1. I'll have it printed on coated paper at a print shop, and glue/stick in over the face of the switch panel.
This is what it looks like now.
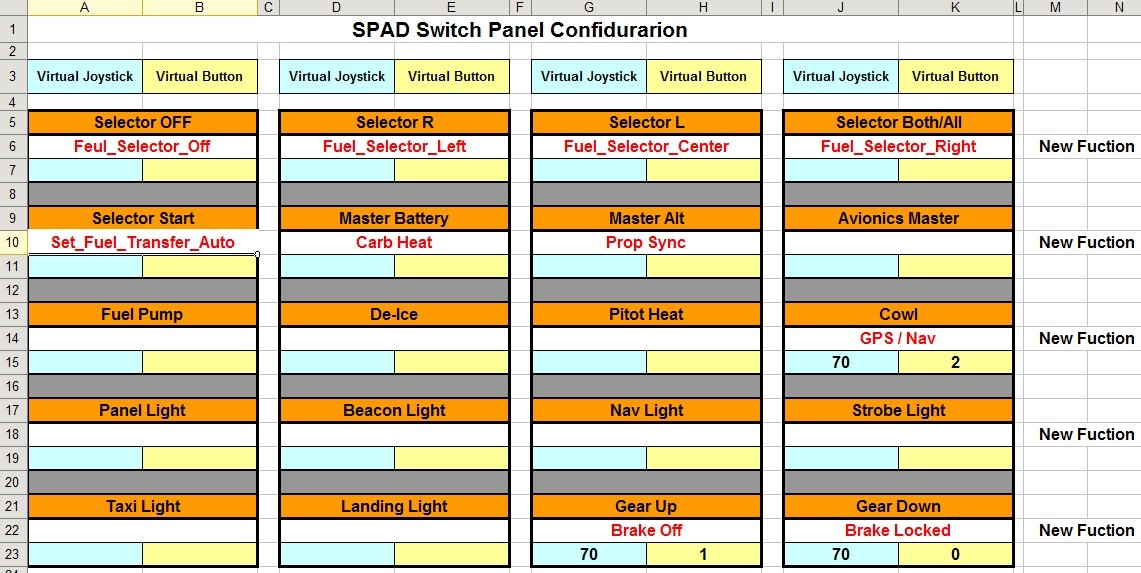
These are the assignments for the moment. Any suggestions will be gladly received. But remember I mostly fly low & slow. Some jet commands may be worthwhile though.
FSUIPC has a list of commands in the Zip file. Another good source of info (but not all that fresh) is Event IDs from Microsoft.
That's all for now.
I now have a ton of buttons and a lot of possibilities. Learning the commands and how to use them is great.
FSX/Prepar3d can only "see" the switch panel as a Saitek Switch Panel. Using ONLY the Saitek driver/software, you can't make any changes.
And that's where SPAD and FSUIPC come in.
FSUIPC can control just about everything in FSX/P3d. BUT it can't "see" the Saitek panels.
SPAD, on the other hand, was created to operate the Saitek Pro Flight panels MUCH better than the Saitek software.
If that was all there was to it, this would be a very short story.
But the creator of SPAD also added the ability to capture the input from the Saitek Pro Flight panels, and send them to FSUIPC as if they were joystick buttons.
I won't go into all the details, but it's quite flexible in the ways that you can use it.
This is the main SPAD control panel. It'll list any Pro Flight control panels that you have plugged in. It will not list the small instrument panels.
As you can see I have two Switch Panels - switch panel 1 & 2. The original switch panel is back in its' place underneath the radio panel.
The new switch panel (Switch Panel 2) is now on the edge of the desktop and to the left of where the yoke would normally be. That one behaves entirely normal.
The one under the Radio panel has all the switches set to "No Event". You move a switch & nothing will happen. At least until I program it.
To program any of the switches is extremely easy. In fact, it can hardly be called "programming". It's more like "select this or that".
Click on the panel tab, Switch Panel 1 and then the SPAD Setup button. This'll pop up.
In this case I've already selected the Gear UP button.
I then select FSUIPC Virtual Button to create a virtual joystick & button. Again, I've already assigned a virtual joystick/button to it - 70 & 1.
NEXT you have to open FSUIPC. Go to the Buttons + Switches tab.
Then back again to SPAD Configuration. When you click on the Send button to Flight Sim it'll be intercepted by FSUIPC. You can now click OK on the SPAD screen. You're done for the moment.
As soon as you hit the Click button above, the virtual joystick & virtual button will show up in FSUIPC.
After that, all you have to do now is decide just what the button will do. In this case I selected to use a FS control called Brakes. You can safely ignore Parameters for now.
That wasn't all that hard was it?
FSX and Prepar3d treats the command Brakes as a toggle.
Toggles will normally work with two presses. One to set it, and press it again to unset it. This is important because when I lift the lever upwards I want it to toggle the brake off.
I want to activate the parking brake by pulling the lever down. FSUIPC used the FSX internal command Parking Brakes to set the parking brake. The command Brakes will release the parking brakes.
This is the setup for setting the parking brakes.
The reason that I have it this way is because FSX will sometimes set Brakes or Differential Brakes when I use the Saitek rudder. So far this has never happened with P3d.
By cycling through the brake lever, it'll clear the situation.
Later I'll create an overlay to cover the text on the face of Switch Panel 1. I'll have it printed on coated paper at a print shop, and glue/stick in over the face of the switch panel.
This is what it looks like now.
These are the assignments for the moment. Any suggestions will be gladly received. But remember I mostly fly low & slow. Some jet commands may be worthwhile though.
FSUIPC has a list of commands in the Zip file. Another good source of info (but not all that fresh) is Event IDs from Microsoft.
That's all for now.


 -
-