Sytses Moody Pics 2 (StudioV)
Sytses Moody Pics (continued from page 1)
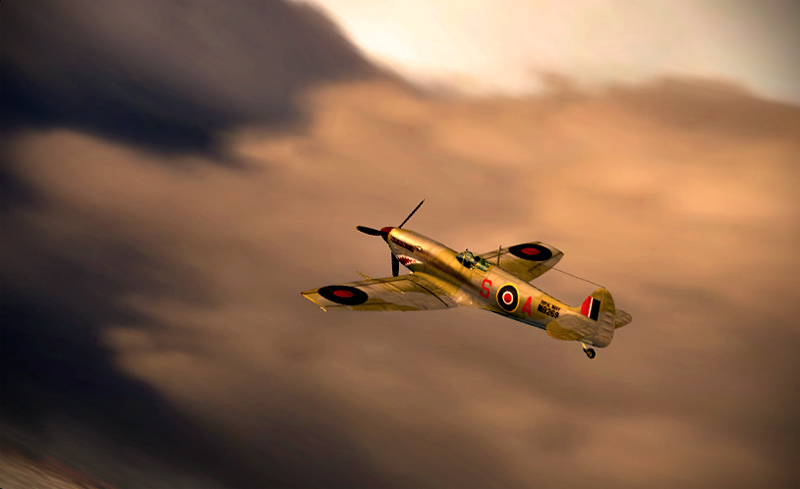
Step 8: colour
I think the shot looks a bit too bright for the weather conditions (stormy thick black clouds) and a bit too red. So let's apply some colour burn. My experience tells me that the colour that I should use to get rid of the redness is green. So let's select a dark green colour.
To apply the dodge, again, select a big hard brush with low opacity, this time set to colour burn blending mode. Paint over the shot.
Step 9: details
The mood of the shot is pretty much set now, so let's take a look at the deatils. The first thing I notice is the wire of the antenna. It doesn't look too good, so let's enhance it a bit.
Select the line tool and draw in a new line over the wire. Take a look at the settings in the toolbar.
Next up: the canopy. It just looks too blue to me, so let's make it a bit more orange like the rest of the shot. Select up a small brush, about 30% hardness and set blending mode to 'colour'. Now, carefully paint over the canopy.
The markings on the fuselage also look a bit too red to me, so let's desaturate a bit. Set up a small soft brush set to saturation and select a black or white colour. Set opacity to a low value and draw over the markings.
Step 10: highlights
To make the lighting look extra nice, you should add some highlights. This particular model already looks pretty good, but some places are lacking highlights, like the canopy. You can draw in highlights with a small, soft brush set to colour dodge. Again, low value of opacity! (You might want to draw in a little white -low opacity- first on very dark parts.)
Pay close attention to direction of the lighting on the aircraft!
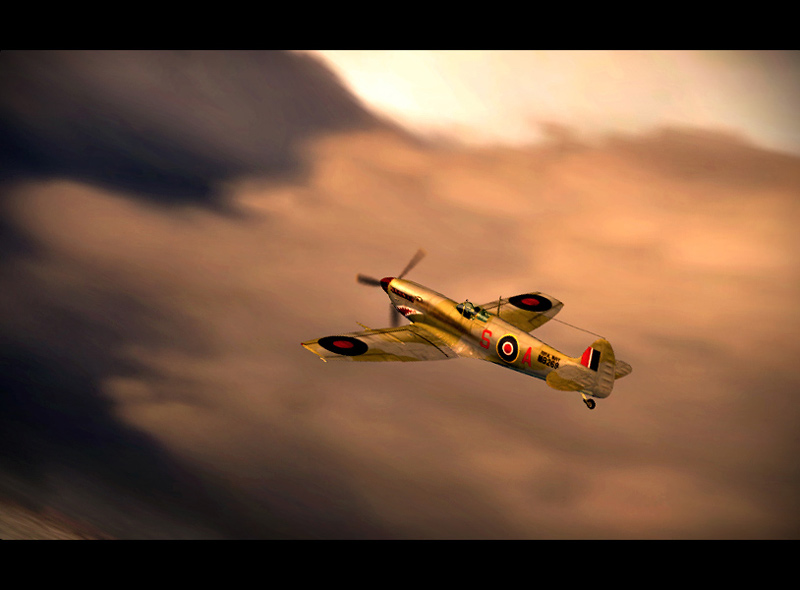
Step 11: almost done
The shot is kind of done now. You can add some things to enhance the shot to your own taste. Maybe make it black and white or add a vignet. I personally like vignet, because it makes you focus on the middle of the shot.
Here's how to do the vignet:
Go to FILTER - DISTORT (?) - LENSE CORRECTION
Step 12: last minute colour change?
If you're not satisfied yet with the colours of your shot, maybe adding a photo filter will help.
DONE!
See how a few simple techniques can greatly enhance the looks of your screenshot?
Here is my end result after a bit more editting:
Thanks for reading my tutorial. I hope you learnt something out of this.
If you have any questions about the tutorial, or anything else for that matter, please don't be shy to contact me.
Happy editing!
Sytse
Step 8: colour
I think the shot looks a bit too bright for the weather conditions (stormy thick black clouds) and a bit too red. So let's apply some colour burn. My experience tells me that the colour that I should use to get rid of the redness is green. So let's select a dark green colour.
To apply the dodge, again, select a big hard brush with low opacity, this time set to colour burn blending mode. Paint over the shot.

Step 9: details
The mood of the shot is pretty much set now, so let's take a look at the deatils. The first thing I notice is the wire of the antenna. It doesn't look too good, so let's enhance it a bit.
Select the line tool and draw in a new line over the wire. Take a look at the settings in the toolbar.

Next up: the canopy. It just looks too blue to me, so let's make it a bit more orange like the rest of the shot. Select up a small brush, about 30% hardness and set blending mode to 'colour'. Now, carefully paint over the canopy.

The markings on the fuselage also look a bit too red to me, so let's desaturate a bit. Set up a small soft brush set to saturation and select a black or white colour. Set opacity to a low value and draw over the markings.

Step 10: highlights
To make the lighting look extra nice, you should add some highlights. This particular model already looks pretty good, but some places are lacking highlights, like the canopy. You can draw in highlights with a small, soft brush set to colour dodge. Again, low value of opacity! (You might want to draw in a little white -low opacity- first on very dark parts.)
Pay close attention to direction of the lighting on the aircraft!

Step 11: almost done
The shot is kind of done now. You can add some things to enhance the shot to your own taste. Maybe make it black and white or add a vignet. I personally like vignet, because it makes you focus on the middle of the shot.
Here's how to do the vignet:
Go to FILTER - DISTORT (?) - LENSE CORRECTION


Step 12: last minute colour change?
If you're not satisfied yet with the colours of your shot, maybe adding a photo filter will help.


DONE!
See how a few simple techniques can greatly enhance the looks of your screenshot?
Here is my end result after a bit more editting:
Thanks for reading my tutorial. I hope you learnt something out of this.
If you have any questions about the tutorial, or anything else for that matter, please don't be shy to contact me.
Happy editing!
Sytse


