Page 1 of 1
ok,,

Posted:
Mon Sep 03, 2007 12:35 amby chase s.
im still new to all the flying thing. im still trying to learn must of the stuff in the cockpit, but one thing im confused about is autopilot. like i heard that you punch in a few numbers and other things ( that i dont know ) and the plane will basically fly itself. if it really does that, you probably know my question,, how do you do it? :-?
if you could help, it will be very much appreciated ;D
Re: ok,,
Posted:
Mon Sep 03, 2007 1:08 amby videokid1969
I myself would like to know how to use the GPS to program a flight path. Where would a person go to learn on how to use the GPS to program a flight path and not just use the GPS to see where you are at.
Re: ok,,
Posted:
Mon Sep 03, 2007 1:20 amby Nav
Be easy to write six pages and still not cover the whole subject, chase_23!

Partly because your question involves not just use of the autopilot but also use of the navigation and landing aids.
I suggest that you take it step by step. Assuming you are 'flying' the simpler default props, there are really only two things to grasp - heading and height. The autopilot will hold a course and a height for you, and also climb, descend, or turn for you; but you have to handle the power yourself.
I suggest that you first get to a height, set that and your course on the autopilot, and turn it on. To find the right buttons on whichever aeroplane you're using, refer to the Learning Centre. Then experiment with altering the height and course settings (not forgetting to add or reduce power depending on whether you want to climb or descend). That's all most pilots of light aeroplanes use the autopilot for; takeoffs and landings are carried out manually.
The next step is to move on to using the autopilot to follow the Instrument Landing Systems at major airports. The one after that is to graduate to larger aeroplanes. particularly the jets, on which an autothrottle or 'Speed Hold' is also fitted. The third 'area' is to use the autopilot and the navigation aids, like 'NAV Hold' or 'GPS Hold,' to fly planned routes (Flight Plans) for you.
I suggest that you first get the hang of setting and holding heights and courses, climbing and descending etc., and then come back on here and we'll brief you on the next step? Should only take you half an hour's flying to get the first bit sorted out? And please tell us next time which aeroplane you're flying, that will make helping you a lot easier.
Re: ok,,
Posted:
Mon Sep 03, 2007 3:10 amby Xyn_Air
Here is a rough guide to using the autopilot functions in FS2004 in two parts. The first part goes over some of the basic A/P controls you should become familiar with. Part two covers their usage.
BASIC FAMILIARIZATION
For this explanation, I am using the default Boeing 737-400. Obviously, control panel layout will vary from aircraft to aircraft. However, the control functions are pretty much the same, and the Boeing 737 cockpit has its Autopilot controls in an easy to find location.
Look at the top of your control panel in the 2D cockpit. You should see a row of controls and numeric gauges with such names as COURSE, HDG, IAS/MACH, and so on. These are you autopilot controls. AS you mouse over the various control surfaces and your mouse cursor turns into a hand (indicating an interactive control), you will briefly get pop-up names for each of the controls or gauges.
In FS2004, the values for your Autopilot are most often adjusted directly on the Autopilot gauges themselves (the "Selectors). As you move your mouse cursor over the Selectors, you will notice a '+' or '-' appearing inside the hand cursor. This directly corresponds to increasing or decreasing the value of the current Selector. When you left click with your mouse, the Selector will change in value as indicated by the '+' or '-' in the cursor. However, the longer you hold the left mouse button while adjusting a Selector, the faster that Selector will change in value.
Look for and identify:
Switches
Autopilot Master Switch - Marked A/P with settings CMD and OFF. Turning to CMD enables your autopilot, but you will still need to turn on specific features of the autopilot for the A/P to control those aspects of flight. Turning A/P to OFF returns the aircraft to manual control.
Heading Hold Switch - Marked HDG, this will activate the Heading Hold function of the A/P. Your aircraft will then stay on the heading selected in the Heading Selector.
Autothrottle Switch - Marked A/T and to the left of the Autopilot Master Switch, it has settings ARM and OFF. Setting the A/T to ARM will ready the autopilot to control the aircrafts speed by using the throttles (as opposed to pitch). You will still have to activate either the Speed Hold Switch or the Mach Hold Switch before the Autopilot will control both throttles and airspeed.
Speed Hold Switch and Mach Hold Switch - These switches are marked IAS and MACH, respectively, and select whether the Speed Hold Selector displays either KIAS or Mach value and selecting one of these switches after the A/T is armed fully engages the A/T control function of the autopilot. Once the A/T is armed and either IAS or MACH is selected, the autopilot will use the throttles to try to maintain the speed indicated in the Speed Hold Selector.
Altitude Hold Switch - This switch is marked ALT. When selected, the autopilot will try to keep or move the aircraft to the altitude indicated in the Altitude Hold Selector.
There are other controls to the Autopilot (such as the Flight Director, Yaw Damper, etc.), but these are the basic functions you will want to learn and become familiar with. Let's move on to the Selectors.
Selectors
Heading Hold Selector - Marked HDG, the value in this Selector ranges from 001 to 360 (measured in degrees). When the Heading Hold Switch is active, the A/P will keep the aircraft on the heading in the Heading Hold Selector. Do not confuse this with the Nav Hold Selector.
Speed Hold Selector - Marked IAS/MACH, this selector will either display a value in knots (if the IAS Hold Switch is active) or Mach value (if the Mach Hold Switch is active). If the A/T is armed and either the IAS or MACH Hold Switch is active, the A/P will try to use the throttles to reach or maintain the indicated airspeed.
Altitude Hold Selector - Marked ALTITUDE, this selector is set to display altitude in feet above Mean Sea Level (MSL); it is NOT your altitude above the ground. When the Altitude Hold Switch is active, the A/P will attempt to reach or maintain the altitude indicated in the Altitude Hold Selector.
Next up: BASIC USE
Re: ok,,
Posted:
Mon Sep 03, 2007 3:33 amby Xyn_Air
BASIC USE
Once you have your aircraft up in the air and in straight and level flight, you can turn your attention to setting up your autopilot. The important thing to remember here is that you should always adjust your autopilot settings before activating any feature of the autopilot. If you turn on your autopilot without first checking your settings, you could be telling the autopilot to plunge your aircraft into the ground or fly you opposite the heading you want to go.
Setting up your Selectors
1) Heading Hold Selector - Mouse over the Heading Hold Selector. Adjust this value to the heading you wish to follow. Let us say you wish to head due east. Simply adjust the Heading Hold Selector up or down until the readout shows 090 degrees. Your Heading Hold Selector is now set for 090 degrees which will cause the A/P to turn the aircraft due east once active.
2) Speed Hold Selector - Mouse over the Speed Hold Selector. By default, it's value should be set to IAS, so that is what I will use in this explanation. Change this value in much the same way you changed the Heading Hold Selector, only this time you are setting the airspeed for the A/P to hold. Be sure to not set your airspeed too high or too low. For our Boeing 737-400 that I mentioned in part one, let's set our Speed Hold Selector to 300. Once active, the A/P will use the A/T to try and keep our aircraft at 300KIAS.
3) Altitude Hold Selector - Mouse over the Altitude Hold Selector. If you are flying low to the ground, you will want to make absolutely sure you do not set this value below terrain elevation. Just because you have the Altitude Hold Selector set to 8,000 feet ASL doesn't mean you are going to clear that 9,000 foot ridgeline. For this example, set the Altitude Hold Selector to 28,000. When active, the A/P will now take our aircraft to 28,000 feet ASL, or FL280.
Now that our primary Selectors are set, let's start bringing the A/P online.
Engaging the Autopilot
1) Autopilot Master Switch - Move the Autopilot Master Switch to the CMD position. The A/P is now active.
2) Autothrottle Switch - Move the Autothrottle Switch to the ARM position. The A/T is now active.
3) Heading Hold Switch - Select the Heading Hold Switch (it will light up when active). As soon as the Heading Hold Switch is active, you should notice the A/P changing the aircraft's heading to 090 degrees (what we selected above).
4) Speed Hold Switch - Select the Speed Hold Switch (it, too, will light up when active). As soon as the Speed Hold Switch (IAS) is active, you should notice the A/P using the A/T to maintain 300KIAS (as was set above).
5) Altitude Hold Switch - Select the Altitude Hold Switch (it, too, will light up when active). As soon as the Altitude Hold Switch is active, you should notice the A/P taking the aircraft to the selected altitude and maintaining FL280.
Making Changes to the Autopilot while In-Flight
If you need to change any of the settings to the autopilot in-flight, you can do so by simply adjusting the value of the appropriate Selector. You do not need to deactivate the autopilot to make these changes.
For example, let's say we want to change our altitude from FL280 (what we set it to above) to FL240. Simply change the value in the Altitude Hold Selector to 24,000 and the A/P will now move the aircraft to FL240.
It is important to note that as soon as you start making changes to the values in the Selectors, the A/P will immediately start matching the aircraft's flight to those new settings.
Disengaging the Autopilot
To selectively disengage a specific A/P function, simply click on the Switch controlling that function. For example, if you click off the Heading Hold Switch, you will disengage the Heading Hold feature of the Autopilot while still maintaining other features such as Altitude Hold and A/T.
To turn off the entire Autopilot, simply move the Autopilot Master Switch to the OFF position. The aircraft is now back under your control. You may also need to move the A/T Switch to the OFF position as well. Never hurts.
---
OK, that is a quick and dirty guide to using your Autopilot functions. I hope that helps you a bit. There certainly is a lot to learn, but if you give yourself time, familiarize yourself with the cockpit, and use the learning tools available in FS2004, I think you should do just fine. Feel free to message me for clarification or with questions regarding my guide.
All the best,
~Darrin
PS
If you have a flight plan loaded up into your GPS, can switch your Flight Director to GPS mode an turn the F/D switch to ON and the A/P will automatically fly your aircraft along the flight plan loaded into your GPS. I did not add that in detail here because creating a flight plan and using your GPS are a bit of a separate topic. Bit, this should give you at least a nudge in the right direction if that is also something you are looking into.
~D
Re: ok,,
Posted:
Mon Sep 03, 2007 3:59 amby Fozzer
Why do Folks start of a Heading, or a sentence with...
...."OK"...>:(...!
Reading reams and reams of text makes my head hurt, and I occasionally drop off to sleep, mid-read.
So many years ago, I produced "Fozzer's Simple Guide to Radio Navigation".
"Simple" being the operative word...;)...!
(I like looking at "Pictures").
So, many Folks have found this useful, in conjunction with studying the "Flying Lessons" in the Simulator... 8-)...!
Have a peek at this Picture... :)....>>>
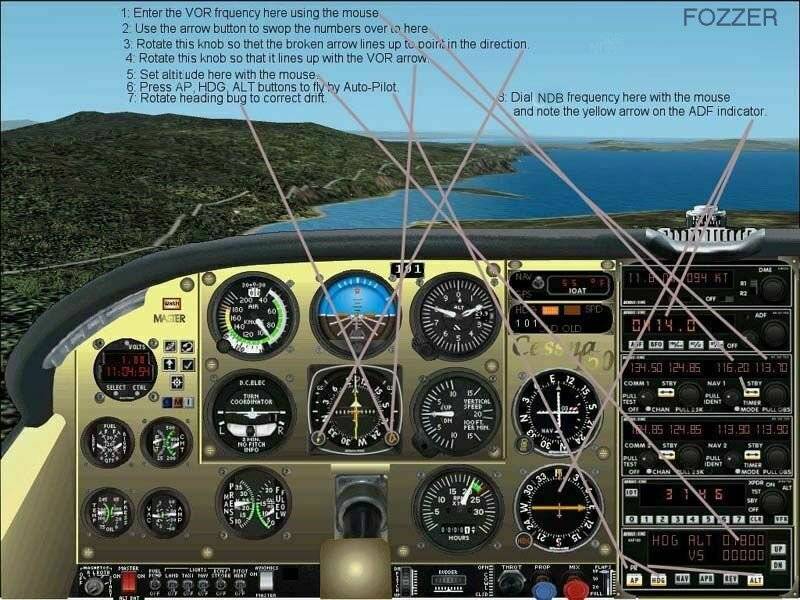
...before you drop off to sleep...or collide with the aircraft in front of you...

...!
The necessary Frequencies to dial-in can be found from a number of sources, including your Sim GPS Map, FS Navigator, etc.
(Sorry Darrin)...Nah!...Life is too short for lots of typing!....

....

...!
F....G-BPLF... 8-)...!
Re: ok,,
Posted:
Mon Sep 03, 2007 10:07 amby JBaymore
(Sorry Darrin)...Nah!...Life is too short for lots of typing!....
....
...!
OK (
Re: ok,,
Posted:
Tue Sep 04, 2007 6:07 pmby chase s.
hey thank you so much Xyn_Air, what you put was soooo helpful!
it answered all my questions and ive already used it. again, thank you!
Re: ok,,
Posted:
Wed Sep 05, 2007 1:03 amby Xyn_Air
No problem. I am glad it was of some use to you. If you are like me and enjoy making long flights of several hours, knowing how to use the autopilot can really lighten the workload and allow you to enjoy other aspects of the flight. When you start using A/P in conjunction with an IFR flight plan, ATC, and the ILS landing functions, everything really begins to flow smoothly. Just don't forget to take a Cessna up now and again for some good old VFR flying; never hurts to keep all your skills up to snuff. ;) Anyway, enjoy the autopilot!
Best wishes,
~Darrin
PS
If I may ask, what aircraft are you using the autopilot with most?
~D
Re: ok,,
Posted:
Wed Sep 05, 2007 4:04 pmby chase s.
im using a boeing 777-200. its awesome :)