 by Xyn_Air » Mon Sep 03, 2007 3:33 am
BASIC USE
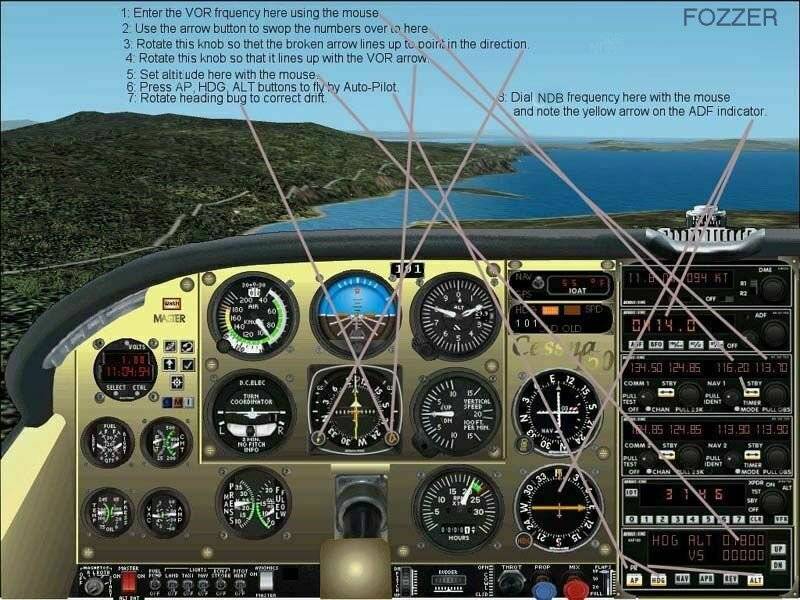
Once you have your aircraft up in the air and in straight and level flight, you can turn your attention to setting up your autopilot. The important thing to remember here is that you should always adjust your autopilot settings before activating any feature of the autopilot. If you turn on your autopilot without first checking your settings, you could be telling the autopilot to plunge your aircraft into the ground or fly you opposite the heading you want to go.
Setting up your Selectors
1) Heading Hold Selector - Mouse over the Heading Hold Selector. Adjust this value to the heading you wish to follow. Let us say you wish to head due east. Simply adjust the Heading Hold Selector up or down until the readout shows 090 degrees. Your Heading Hold Selector is now set for 090 degrees which will cause the A/P to turn the aircraft due east once active.
2) Speed Hold Selector - Mouse over the Speed Hold Selector. By default, it's value should be set to IAS, so that is what I will use in this explanation. Change this value in much the same way you changed the Heading Hold Selector, only this time you are setting the airspeed for the A/P to hold. Be sure to not set your airspeed too high or too low. For our Boeing 737-400 that I mentioned in part one, let's set our Speed Hold Selector to 300. Once active, the A/P will use the A/T to try and keep our aircraft at 300KIAS.
3) Altitude Hold Selector - Mouse over the Altitude Hold Selector. If you are flying low to the ground, you will want to make absolutely sure you do not set this value below terrain elevation. Just because you have the Altitude Hold Selector set to 8,000 feet ASL doesn't mean you are going to clear that 9,000 foot ridgeline. For this example, set the Altitude Hold Selector to 28,000. When active, the A/P will now take our aircraft to 28,000 feet ASL, or FL280.
Now that our primary Selectors are set, let's start bringing the A/P online.
Engaging the Autopilot
1) Autopilot Master Switch - Move the Autopilot Master Switch to the CMD position. The A/P is now active.
2) Autothrottle Switch - Move the Autothrottle Switch to the ARM position. The A/T is now active.
3) Heading Hold Switch - Select the Heading Hold Switch (it will light up when active). As soon as the Heading Hold Switch is active, you should notice the A/P changing the aircraft's heading to 090 degrees (what we selected above).
4) Speed Hold Switch - Select the Speed Hold Switch (it, too, will light up when active). As soon as the Speed Hold Switch (IAS) is active, you should notice the A/P using the A/T to maintain 300KIAS (as was set above).
5) Altitude Hold Switch - Select the Altitude Hold Switch (it, too, will light up when active). As soon as the Altitude Hold Switch is active, you should notice the A/P taking the aircraft to the selected altitude and maintaining FL280.
Making Changes to the Autopilot while In-Flight
If you need to change any of the settings to the autopilot in-flight, you can do so by simply adjusting the value of the appropriate Selector. You do not need to deactivate the autopilot to make these changes.
For example, let's say we want to change our altitude from FL280 (what we set it to above) to FL240. Simply change the value in the Altitude Hold Selector to 24,000 and the A/P will now move the aircraft to FL240.
It is important to note that as soon as you start making changes to the values in the Selectors, the A/P will immediately start matching the aircraft's flight to those new settings.
Disengaging the Autopilot
To selectively disengage a specific A/P function, simply click on the Switch controlling that function. For example, if you click off the Heading Hold Switch, you will disengage the Heading Hold feature of the Autopilot while still maintaining other features such as Altitude Hold and A/T.
To turn off the entire Autopilot, simply move the Autopilot Master Switch to the OFF position. The aircraft is now back under your control. You may also need to move the A/T Switch to the OFF position as well. Never hurts.
---
OK, that is a quick and dirty guide to using your Autopilot functions. I hope that helps you a bit. There certainly is a lot to learn, but if you give yourself time, familiarize yourself with the cockpit, and use the learning tools available in FS2004, I think you should do just fine. Feel free to message me for clarification or with questions regarding my guide.
All the best,
~Darrin
PS
If you have a flight plan loaded up into your GPS, can switch your Flight Director to GPS mode an turn the F/D switch to ON and the A/P will automatically fly your aircraft along the flight plan loaded into your GPS. I did not add that in detail here because creating a flight plan and using your GPS are a bit of a separate topic. Bit, this should give you at least a nudge in the right direction if that is also something you are looking into.
~D
Last edited by
Xyn_Air on Mon Sep 03, 2007 3:40 am, edited 1 time in total.
 Partly because your question involves not just use of the autopilot but also use of the navigation and landing aids.

 ...!
...! ....
....  ...!
...!
 Intel i7 960 quad 3.2G LGA 1366, Asus P6X58D Premium, 750W Corsair, 6 gig 1600 DDR3, Spinpoint 1TB 720