Page 1 of 2

Back to work on the Corsair...

PostPosted: Wed Jun 30, 2004 1:51 am
by Wing Nut
Well, after a much needed (but forced upon me, nonetheless) break in working on the Corsair, I am back at it.

Re: Back to work on the Corsair...

PostPosted: Wed Jun 30, 2004 3:22 am
by ozzy72
That is looking really good Kevin ;)
Did you get the scale issue resolved or is she still the size on an An-225?

Mark

Re: Back to work on the Corsair...

PostPosted: Wed Jun 30, 2004 5:23 am
by atotti2000
i wouldn mind if it were that big ::)
lokking really good though (make that another person who is interested 8)

Re: Back to work on the Corsair...

PostPosted: Wed Jun 30, 2004 8:36 am
by Wing Nut
Thanks guys, I appreciate the remarks.

Re: Back to work on the Corsair...

PostPosted: Wed Jun 30, 2004 8:40 am
by Mozz
Looks great :D, wish I knew how to use G-MAX ???

Re: Back to work on the Corsair...

PostPosted: Wed Jun 30, 2004 8:46 am
by Felix/FFDS
Grasshopper:

Patience is of the essence at this point.

To cleanse your mind of distractions, copy the working part to a new model space, tagging it as "inactive".  This way, your concentration is directed wholly to the task at hand.


If you so desire, you can isolate the area you will be working on by selecting and hiding those vertices/points that will not be affected.

delete the polygons in the intake area.

start adding points (select 2, hit CTRL-A) as needed to form the careful outline of the intake.

Once you've outlined the intake, then start creating the polygons to fill in around the intake.

Tedious, but fast and fun once you get the hang of it.

Re: Back to work on the Corsair...

PostPosted: Wed Jun 30, 2004 9:29 am
by Wing Nut
Thanks Felix,  the time has come for me to understand this 'adding points' thing once and for all.   ;D  Until now, I have always been able to find a way around it, but no more.  My understanding of adding points is this:

To add points you need to enter template mode with this button - Image.  You then add points by clicking on this button Imageby clicking on one spot to enter the first point and another to enter a second.
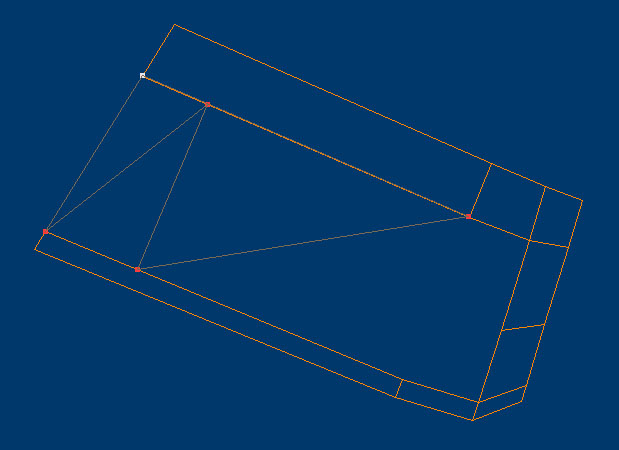
Unfortunately, the lines I get are shaded, and no poly's are created.  The points cannot be manipulated, and basically, nothing is there.  Here is a example.

Image


Is my understanding of this completely off?  I remember doing this from the tutorials with the water tower (it was the first lesson) but it doesn't seem to work here.

Re: Back to work on the Corsair...

PostPosted: Wed Jun 30, 2004 10:42 am
by Felix/FFDS
What you're describing is making a template from which to extrude a part.

This is actually selecting two points and creating a third point halfway between the selected two.

Example.

Selecting points:
select point 1 - click on it, it turns white, and press the space bar.

select point 2 - click on it, it turns white, and press the space bar.

Adding the 3rd Point:
Part-> Add Point   (or shortcut CTRL-A)

this adds a third point halfway between points 1 and 2.

To keep adding points, unselect the first two points (Shortcut: Shift-U) and repeat as needed.

Yes, in gmax you could do a shape merge (less messy) or boolean cut, but this is FSDS :)

Re: Back to work on the Corsair...

PostPosted: Wed Jun 30, 2004 11:36 am
by Wing Nut
Mwaa ha ha ha!  At last, my plan for world domination through adding points can proceed unhindered.  No one can stop me now!   ;D

Image


Do you think I've been working on this a bit too long?  :)

Re: Back to work on the Corsair...

PostPosted: Wed Jun 30, 2004 12:58 pm
by Felix/FFDS
[quote]
Do you think I've been working on this a bit too long?

Re: Back to work on the Corsair...

PostPosted: Wed Jun 30, 2004 4:06 pm
by SilverFox441
HAH!

I've got an unfinished project that started in AF99! :)

I'll finish it too...if I ever figure out where they hid the glue in FSDS.

That Super Corsair is starting to look REAL good. Take Felix's advice and use patience...not like me who invariably get into a rush to have it flying.

Re: Back to work on the Corsair...

PostPosted: Wed Jun 30, 2004 4:11 pm
by Felix/FFDS
HAH!

I've got an unfinished project that started in AF99! :)

I'll finish it too...if I ever figure out where they hid the glue in FSDS..


Did I tell you about my HAL Ajeet that I started in FSDS1.3 and exported to FS98?    If I'd known how to use glue in AF99, it would have worked.

Re: Back to work on the Corsair...

PostPosted: Wed Jun 30, 2004 4:40 pm
by Wing Nut
There must be some kind of record somewhere for the longest time to complete a project.  Some of these things must have taken years to develop.   :o

Re: Back to work on the Corsair...

PostPosted: Wed Jun 30, 2004 7:30 pm
by Stratobat
Youch :o

Nice work, Dread Pirate Roberts 8)

Regards,
Stratobat

Re: Back to work on the Corsair...

PostPosted: Wed Jun 30, 2004 7:30 pm
by SilverFox441
Some projects are just "beyond" the state of the art. They tend to take forever for the simple reason that they can never work. :)

Be thankful that Louis Sinclair gave us FSDS and that MS gave us proper z-bias..."glue" in Flightshop/AF99 was a very tedious thing to work out. I finally found a very good tutorial from one of the AF99 masters that explained "glue" pieces and how to use them to control display order and bleedthrough. The basic idea was that you would make a "glue piece" to attach two other pieces in a specific order of display. A complex project could have as many glue pieces as structural! Everything turned into a major pain in the backside... :)

Check out http://www.simviation.com/cfs/reviews/c ... eviper.jpg

The viper is mine from AF99 (in CFS1), it has these virtual glue pieces everywhere to stop bleedthrough...and it still didn't work out quite right! That Viper has twice the workhours of my current version...and less than 10% of the detail. :)

Felix, you can finish your Ajeet...the glue tutorial came from FFDS. :)