Page 1 of 2

Gmax snaps

PostPosted: Tue Sep 09, 2003 4:09 am
by Travis
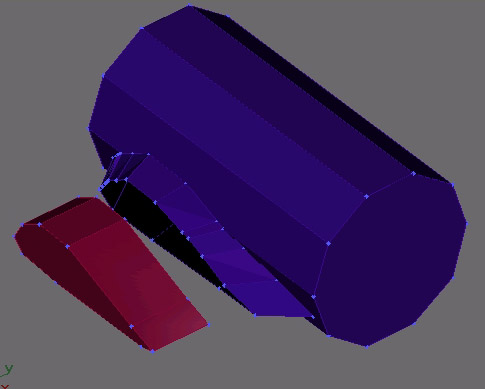
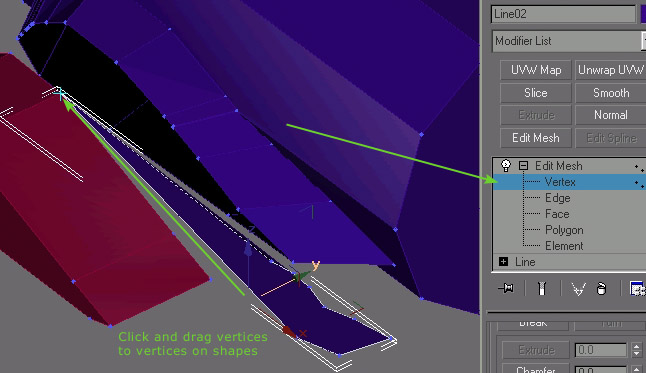
Okay, I want to snap some vertices on a fuselage to the vertices on a wing, without doing any modification to the wing.

I have tried making the wing part of the fuselage and then colapsing the vertices but the wing was deformed when I did this, and it has to stay the same, otherwise other parts of the thing go awry.

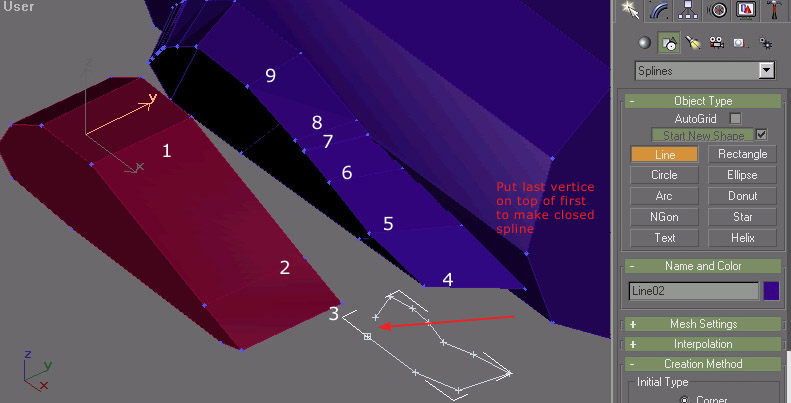
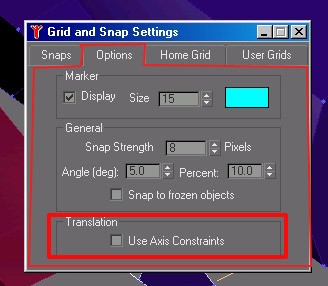
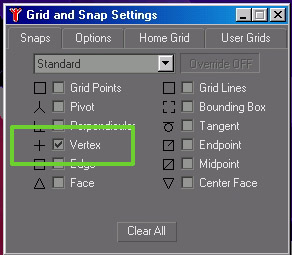
I suppose I should use Snap/Vertex, but it doesn't seem to work.  I open the snap box that displays the available snaps, and check Vertex and uncheck everything else, and then try moving the vertices around to the approximate position they should be in.  As far as I know, this should make them "jump" to the nearest vertex, but they don't seem to do it.  Is there something else I should be doing?  Do I have to push some button or turn something else on/off?

HEEEELLLLPPP!!!!! :-[

Re: Gmax snaps

PostPosted: Tue Sep 09, 2003 5:21 am
by Felix/FFDS
Two things come to mind

1. Boolean operation - wing U fuselage (union of wing and fuselage.)  You can always detach that part of the fuselage the will join with the wing (as a clone) before you do the boolean join.  (Of course, back up the project first)

2. Use the connect modifier.  detach the polygons in the fuselage that face the wing and those in the wing (endcap) that face the fuselage.  Use the connect modifier to make the fuselage/wing join/fillet.

Re: Gmax snaps

PostPosted: Tue Sep 09, 2003 2:50 pm
by Travis
I think I need more practice with Gmax before I attempt a project.  I guess I'll just have to give up on the current one and go back to school.

Agravation after agravation . . . .

Re: Gmax snaps

PostPosted: Tue Sep 09, 2003 4:29 pm
by Felix/FFDS
Don't give up - I've been trying to make heads or tails out of gWax for two years already ... since FS2002 came out... am still not there....

Re: Gmax snaps

PostPosted: Tue Sep 09, 2003 7:43 pm
by X_eidos2
Could you post a screen shot of what you're trying to do?

I've found pictures help a lot in understanding what the problem is and pictures do a great job of showing solutions as well. If I weren't in the middle of a couple major life events I'd sit down and make a simple tutorial on using the snap tool. (The snap to edge tool in all Discreet products is pretty useless IMHO)

Re: Gmax snaps

PostPosted: Wed Sep 10, 2003 10:50 pm
by Travis
Okay, a screenshot.
I'm trying to attach the wing to the fuselage wthout moving the vertices on the wing.

Image

Re: Gmax snaps

PostPosted: Thu Sep 11, 2003 5:33 am
by Adam Preece
The brute force & ignorance way would be to write down the coordinates of the wing root vertices then change the fuselage vertices to fit.  ;)

However this will only work if you have an exact match of vertices either side of the join I'm afraid.....  :(

Hope that helps a bit.

A.

Re: Gmax snaps

PostPosted: Thu Sep 11, 2003 6:38 am
by Felix/FFDS
I vote for the connect modifier.

Alternatively, the masochistic way would be to make the indivual polygon/faces one at a time.

Re: Gmax snaps

PostPosted: Thu Sep 11, 2003 11:45 am
by Travis
Well, for this project, since I was a bimbo and didn't FOLLOW THE DIRECTIONS ::) 
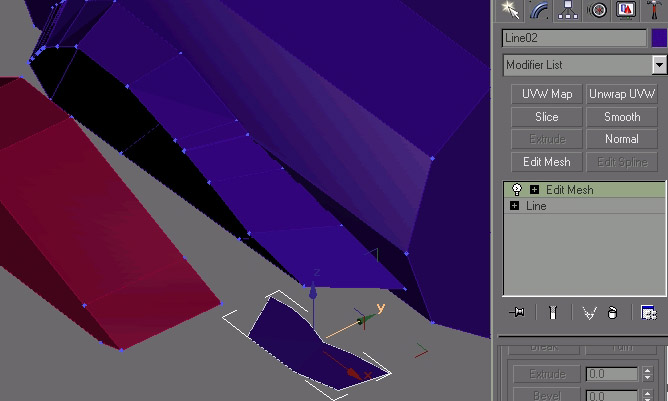
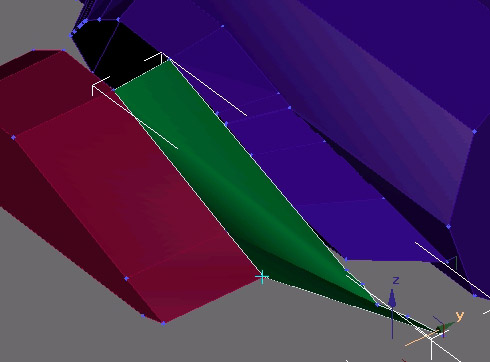
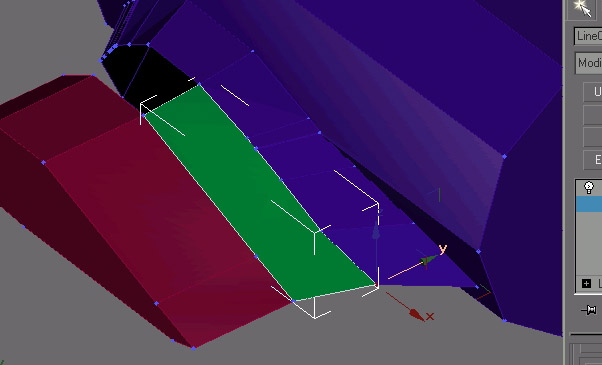
I used Mr. Preece's advice and did the stuborn thing.  Only problem is, its gonna take me another two hours to do the tail!  But, since I was a bimbo, I'm getting my just desserts.

I will remember next time, I swear!!!

Re: Gmax snaps

PostPosted: Thu Sep 11, 2003 4:57 pm
by X_eidos2
There's a much simpler way to accomplish your goal.
It'll take me much longer to make the how-to-do-it pictures than it will to do the task.

While you wait for the mini-tutorial, here's a little bit of useful modeling knowledge I just recently discovered.

While you can not copy/paste 3d mesh in Gmax. You can copy/paste text info. If you leave the co-oridnates box open while working on your vertices you can do the following.

1. Select the vertice you are trying to match. The x,y,z co-ordinates will show up in the boxes on the left.

2. Hi-light or select the x co-ordinate
3. press ctrl+c
4. select the vertice you want to move
5. Hi-light or select the x co-ordinate
6. press ctrl+v
7. Do the same steps for the y and z co-ordinates.

It goes much quicker than writing things down and re-typing them in.

I haven't found a way to copy all three co-ordinates at the same time, but it's still a lot quicker.

The copy/paste will also work with part names. You can even have a text file open with "tag" names and you can name your parts quickly using this copy/paste method.

Re: Gmax snaps

PostPosted: Thu Sep 11, 2003 6:42 pm
by X_eidos2
OK- here's a quick and unrefined tutorial

The set up is similar to Ender Baron's screen shot. I've gone into the properties and turned on the vertice tics so it's easier to see what's going on. I made it so there are different numbers of vertices on the edge of the wing and on the edge of the fuselage.

Image


First grab the line tool, and then create a simple closed spline that has the number of vertices that you want to have in your connector patch. In this example I'll want nine vertices.  It's important that you make this spline in an open area on the viewport, and not on top of other shapes.

Image

Answer yes when it ask if you want a closed spline. With the spline selected, select edit mesh modifier or just convert the spline to an editable mesh.

Image

Right click on the 3d snap button to bring up the grid and snap settings - under options make sure the translation use axis constraints is UNCHECKED

Image

under snaps just select vertice - have everything else unchecked

Image

Now select the connection patch polygon and get into edit mesh, vertice level, with 3d snap ON (hitting the S key will toggle the 3d snap tool on and off) and then click and drag the vertices to the different vertices on the two shapes you want to connect.

Image

I changed the color of the polygon so it'd be easier to tell apart from the other shapes. Work your way around till all the vertices have been snapped into place.

Image

You should end up with something that looks like this

Image

Then it's just a matter of picking either the wing or the fuselage and with an edit mesh modifier on, select attach and then click on your connection polygon and you set.

Image

Then you would repeat the process until you had all the patches you needed to complete the connection. I usually would have 3 or four, depending on how curvered the bottom of the wing is.

Hope this helps.   Gotta go pack.

Re: Gmax snaps

PostPosted: Thu Sep 11, 2003 8:17 pm
by Travis
Wow!  Thanks, Eidos!  I like this so much, I'm bookmarking it! :D

Ask and ye shall receive!!

Re: Gmax snaps

PostPosted: Thu Sep 11, 2003 8:26 pm
by X_eidos2
Felix and others have been helping me with my movie project. I thought it was time for a little tutorial, sort of like pay-back.

This community is at it's best when people help one another.

Re: Gmax snaps

PostPosted: Thu Sep 11, 2003 9:29 pm
by Felix/FFDS
Saved, noted - now to reformat and post ... you know where...

F

Re: Gmax snaps

PostPosted: Sat Sep 13, 2003 1:09 am
by Travis
Okay, I know this is probably posted in some tutorial, but if somebody could give me a quick answer, I would be grateful.

I'm attempting to create the gear structures, but to do that, I must have them in the down position.