Page 1 of 1
Cockpit Construction Continued (Part 15)

Posted:
Mon Apr 04, 2005 8:47 pmby JBaymore
Installing the Overhead Panel Rail Frames
This afternoon I got to work on constructing the "rails" that will hold the overhead control panels.
Re: Cockpit Construction Continued (Part 15)
Posted:
Mon Apr 04, 2005 10:55 pmby SilverFox441
Very NICE!
It's really starting to look like a real 'pit at this point...getting the right level of complexity and arcane tools.

Re: Cockpit Construction Continued (Part 15)
Posted:
Tue Apr 05, 2005 9:23 pmby legoalex2000
so, still, what logo are you putting on the outside of the flight deck?
have fun, looking forward to the finish!
Re: Cockpit Construction Continued (Part 15)
Posted:
Mon Apr 11, 2005 7:06 pmby JBaymore
Drumlineramos,
The exterior of the simpit will actually be finished to fit into the home office space as unobtrusively as possible. The exterior will be as non-flightdeck looking as possible. The side next to my desk will have a whiteboard and some storage shelving on it. Two other sides are facing right into walls. The other end will have the cockpit door on it.
So unfortuinately no big aircraft logos or paint jobs.
best,
...................john
Re: Cockpit Construction Continued (Part 15)
Posted:
Mon Apr 11, 2005 7:12 pmby JBaymore
Work continues........ sort of.
Tonight I ordered a usb Phidgets LED64 module from PhidgetsUSA.com. The are a bargain for the realism they will provide. The unit will drive 64 discrete LEDs.... enough for all the annunciator lights, and marker lights, and stall warnings, and so on that I might want in the pit.
What values trigger the lights to go either on or off and which values to monitor in FSUIPC are set up in a free software utility they have called FS2Phidget.
Can't wait to get this wired up to the annuncitor light units from Flight Deck Solutions.
best,
.....................john
Re: Cockpit Construction Continued (Part 15)
Posted:
Mon Apr 11, 2005 8:00 pmby SilverFox441
Meant to mention something about those annunciators to you John.
You might want to have a couple of "multistate" indicators...red for one state green for the other. There is no need to have one red and one green LED. You could use two multicolour LEDs both on one way for the red side, both green the other way.
I'm not sure about the LED driver board, but with proper current limiting you can probably do that without wasting outputs...just one for the red/one for the green.
Re: Cockpit Construction Continued (Part 15)
Posted:
Mon Apr 11, 2005 11:23 pmby JBaymore
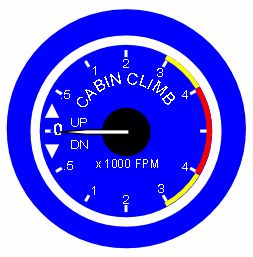
Spent a little time and did up a couple of the "dummy" guage faces for some of the overhead that will be "eye candy" and not really work.... at least to start with. Here is the facing for one of the guages on the cockpit pressurization panel:
It will get printed on transparency film and then backlit with an LED.
best,
..............john
Re: Cockpit Construction Continued (Part 15)
Posted:
Mon Apr 11, 2005 11:25 pmby JBaymore
SilverFox,
Yeah... I was planning on that if it can be done with the board. The gear indicators I want for sure to do that way. And many others too.
Have to wait to see how the board works when I get it.
best,
...........john
Re: Cockpit Construction Continued (Part 15)
Posted:
Tue Apr 12, 2005 12:15 amby SilverFox441
You should defintely be able to add a transistor buffer stage to each LED output...use that to drive as many LEDs as you need on that channel. I'm a little rusty on my circuit design...but I'm sure that guys at Phidgets can sort that out in a second.
For your guage faces...
Are you designing them at a higher resolution and a bigger size? They look good as they are...but if they are designed to the limit of your printer you will have much less chance of jaggies in the finished work. What I mean is...if your printer can print at 2400 DPI, then design at 2400 DPI, not the 72 DPI which is common for web-style work. Obviously that would mean enlarging the original by 33.3333... times to get the same physical output size.
Just wondering.
Re: Cockpit Construction Continued (Part 15)
Posted:
Tue Apr 12, 2005 10:20 pmby JBaymore
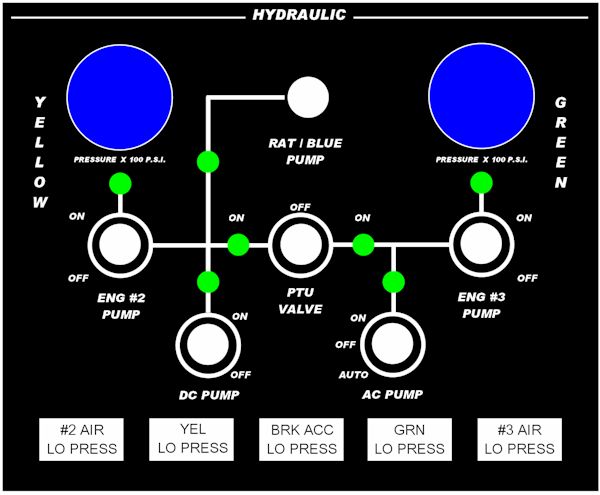
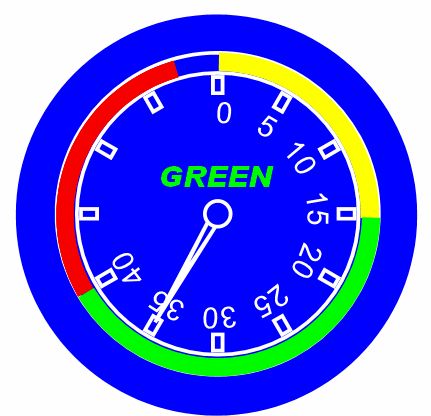
Here is another panel facing that I am working on for the overhead. It is for the hydraulic system. The "RAT / BLUE" location indicated at the top will have a toggle switch with a red guard mounted over it.
The aircraft systems I am basing the flightdeck after are modelled somewhat closely after the BAe 146-200 systems......... but also have factors I have added that will allow the simulation of other aircraft without too much trouble. Hard to balance things out ;).
Two of the round guage images (oversize here) will fit into the 1 1/4" round guage "holes" in the hydraulic panel and be backlit with LED's. The guages are "eye candy"... the switches will work in the sim.
best,
..................john
Re: Cockpit Construction Continued (Part 15)
Posted:
Tue Apr 12, 2005 10:27 pmby JBaymore
OOPS! Gotta go back an downsize some of the shots....... went over the 500 K limit. Have to do that in the AM.
best,
............john
Re: Cockpit Construction Continued (Part 15)
Posted:
Thu Apr 14, 2005 12:02 pmby JBaymore

The Phidgets LED64 board arrived this morning. ;D
That thing is small physically........ about 2" x 4 1/2". And the LED's do not need an added resistor .... which reduces the "pain in the butt" factor tremendously.
Yippee!
best,
....................john
Re: Cockpit Construction Continued (Part 15)
Posted:
Sun Apr 17, 2005 9:32 pmby JBaymore
On to "Part 16"
best,
..............john