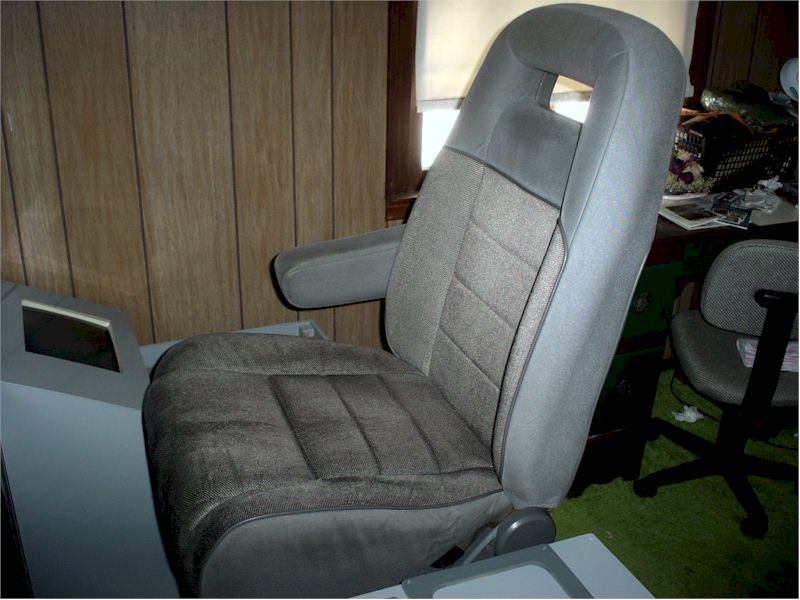
Page 1 of 1

Cockpit Construction Continued (Part 3)

PostPosted: Tue Mar 16, 2004 10:05 am
by JBaymore
Paint and Layout Planning

I have finally had some time to do just a little more work on my simpit.

Re: Cockpit Construction Continued (Part 3)

PostPosted: Tue Mar 16, 2004 3:50 pm
by JBaymore
Got the Pilot's Seat Unit Today

An investment of $25 and about one hour of work at the local auto scrapyard and I have a nice seat for piloting my simpit jet.

Re: Cockpit Construction Continued (Part 3)

PostPosted: Wed Mar 17, 2004 11:26 am
by stormbird
John

Looking good , what sort of Sim flying do you enjoy/want to use it for ?
Currently I am using the excellent VFR for England and so have been tempted down the low and slow route.
On one flight I was at 1000ft and was half way between LandsEnd and the Iseles of Scilly and it was kind of spooky not seeing any land and hoping the heading I guessed from a road map was right !
regards paul

Re: Cockpit Construction Continued (Part 3)

PostPosted: Wed Mar 17, 2004 10:36 pm
by JBaymore
Paul,

Thanks for the kind words.  It is amazing how much more real it looks with the paint and the paper "panels".

As to what type of aircraft....... it is really a "generic" large four engine jet cockpit....modeled up to the center floor pedestal and overhead.  It is modeled a lot on the Airbus....with a little BAe146 thrown in....... and a bit of Boeing.  The nice thing about generic is that you can design your own cockpit the way you want it  ;).  If I tried to make an exact copy of a specific plane....... it would have cost a lot of money and taken far longer.

My favorite aricraft right now is the BAe146-200.  It is a four engine STOL regional jet.  The model I am using is by Jon Murchison.  It is a stunning piece of freeware.  So this cockpit will be "that" plane a lot  ;).  Unfortunately ther are no glass cockpit gauges available that are from the BAe planes.... and the 146-200 is not a VDT display type bird.  So modeling it exactly is not an easy task.

It'll feel kinda "weird" when I am flying a Cessna 172 with all that cockpit hardware..... but such is the nature of things.  I almost built a pretty exact C172 cockpit.  But the heavy metal lured me away.

I fly a lot in Japan.  As a professional potter....I have connections to Japan.... so it is fun to fly there a bit.  Very scenic copuntry.  I've installed different landclass there. Looking for better textures.  One of these days I am going to take a 747 and do the KJFK to RJAA (Narita) flight  ;).


best,

.................john

Re: Cockpit Construction Continued (Part 3)

PostPosted: Wed Mar 17, 2004 10:59 pm
by JBaymore
EFIS Panel with Hardware Assembled


I have been working on some of the panels that will be installed in the cockpit for quite a while.

Re: Cockpit Construction Continued (Part 3)

PostPosted: Thu Mar 18, 2004 6:27 pm
by JBaymore
The Pilot's Seat

Got a couple of shots of the Ford AREOstar drivers seat that I picked up for the pilot's seat in the simpit, as mentioned in a message above.  As you can see in Photo #1, the color is a good match for the grey cockpit I am planning.  Pure luck in finding it.

Photo #1

Image


In Photo #2 I have the seat just proped up on some boxes to just get an idea of the height of the wood base that I will construct to support it at the correct height and angle.  I find that I will be tipping it slightly forward from the angle it sits in a car.  It gives a more natural feel for the cockpit.  Raising the rear by about 1 1/4" from the way it was mounted.

In the photo below it is about 2 1/2" - 3" too high for good line of sight to the "windscreen" (outside view monitors/ projector).

Photo #2

Image


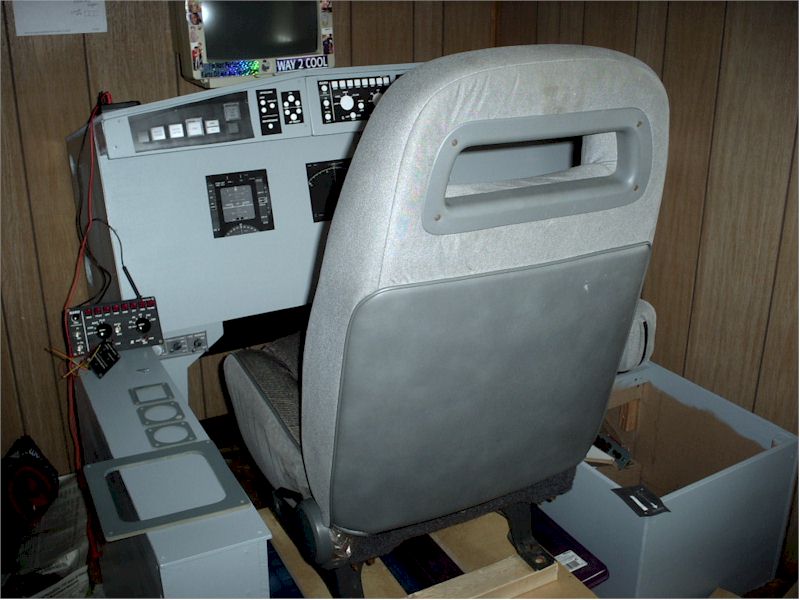
Again....... more will follow.  Hope to continue making more of the main panel instrument "facings" for the glass cockpit gauges soon..... you can see the first ones I've started sitting on the sidestick area in Photo #2 above.  Also I am working on ideas for mounting the CH Products yoke on a vertical shaft to visually simulate the control column in a real jet.

It is amazing how just having the chair there increases the realism further.


best,

...................john

Re: Cockpit Construction Continued (Part 3)

PostPosted: Sun Mar 21, 2004 10:59 pm
by JBaymore
Construction of Pilot Seat Support Base

I constructed the wooden support base for the pilot's seat today.

Re: Cockpit Construction Continued (Part 3)

PostPosted: Mon Mar 22, 2004 3:01 pm
by A/SGT.Mav316
Wow

Re: Cockpit Construction Continued (Part 3)

PostPosted: Wed Mar 24, 2004 9:43 pm
by JBaymore
I did something like that when I was like 16 years old!!


Guess I never did grow up

Re: Cockpit Construction Continued (Part 3)

PostPosted: Wed Oct 13, 2004 8:23 pm
by valp
Hello John,

I have followed with great interest your post on the making of your cockpit. And I must say, I