Here are a couple more of the designs for the custom panels that will populate the center console pedestal in my simpit.
This panel below is mainly for the rudder trim function..... but it also houses a couple of other functions. The first image is the panel facing itself. It will get switches, led's, and rotary potentiometers for the control circuitry.
The dark grey rectangles on the left of the main panel facing are the places that a pair of curved 1/4" MDF "shields" will be mounted that project outward at a 90 degree angle from the panel facing. This is to prevent accidental mis-adjustments of this control.
The rectalinear white box above all the other stuff is for the actual rudder trim gauge readout. This space will simply be cut out to make an opening. Then a small piece of 1/8" MDF will be cut to make a "frame" around the opening with about a 1/4" wide band of material framing the opening....to make it look more like a real gauge assembly.
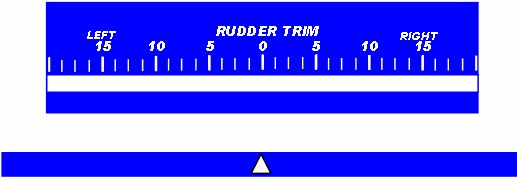
The second image below the panel facing is the "gauge" that will go behind the rectalinear cutout in the panel facing. It will be printed via an inkjet printer on transparent film so that light will come thru it. That's why the nice "boeing Blue" ;). The upper part with the numbers and labels will be mounted between the "frame" and the main panel structure like the glass in a real gauge.
The little strip of blue with the white "pointer" will be mounted
behind the first image so that it is alligned to the small clear strip along the bottom of the numbers and calibrations. This will be able to slide back and forth and move the pointer along the calibration. So you'll have a little white moving pointer in the field of blue.
This thin strip will be attached to the potentiometer the way old radio tuning dials were configured.... with a string system to move them. As the rudder trim potentiometer is turned........ the string wraps or unwraps and hence moves the pointer on the dial face back and forth.
Mechanical pictures of the "tuning" stuff later in another thread.
SO...... some more stuff for ideas or copying for ya'.
best,
...................john