Ripping into an Axispad FX joypad (repost)

Only for Genuine FS fanatics! Taking this hobby from Real to Surreal? Or maybe just combining 4 hobbies into 1 ;)

Ripping into an Axispad FX joypad (repost)

Postby JBaymore » Wed Oct 22, 2003 11:14 pm

This is a starting point for moving prior postings from the "Homebrew Cockpits Survey" thread.  Messages will likely get out of the original sequence.
Last edited by JBaymore on Wed Oct 22, 2003 11:30 pm, edited 1 time in total.
Image ImageIntel i7 960 quad 3.2G LGA 1366, Asus P6X58D Premium, 750W Corsair, 6 gig 1600 DDR3, Spinpoint 1TB 720
User avatar
JBaymore
Global Moderator
Global Moderator
 
Posts: 10020
Joined: Sat May 24, 2003 9:15 am
Location: New Hampshire

Re: Ripping into an Axispad FX joypad (repost)

Postby JBaymore » Wed Oct 22, 2003 11:23 pm

Ripping Into an Axispad FX Joypad  -(corrected)-


(See prior posts in this thread to understand what this unit will be used for.)

I took a few minutes today and started ripping apart the Axispad FX gamepad for conversion to part of a simulated cockpit setup.  Easy disassembly of the main part with about six small screws holding everything.  Then the whole thing just kind of "falls apart".  Watch out for the plastic switch buttonns.... some just fly away.

It is not exactly assembled to ISO 9000 standards  ;).  But then again...... it was only $17.88 at Walmart.  Wires are minimally soldered on and such.  It is not "fragile".... but I wouldn't treat it too rough until you stabilize things and get a feel for what is vulnerable to mechanical movements.

Unfortunately... the mini-joysticks are WELL soldered in place.  Tried using a vacume "solder sucker" tool to unsolder it.... but that didn't work too well.  Too many solder points to clear out too well to free it.  There are four large "mounting" solder points at the corners of the stick, three normal connections on each of the two attached tiny potentiometers, and four connections on the switch that is also attached to the joystick (for when you press down).

I finally decided to use a dremel mini extra thin cutoff wheel and cut the darn joystick connections wherever I could reach them with that tool.  That careful grinding got it off on 2 1/2 sides.  A little gentle wiggling and some judicious prying and metal fatigue got the remaining few points to just break ... and off it came.  While I couldn't figure out a way to save the joystick itself for re-use..... the circuit board and traces came through this scary operation fine.  I then used the solder sucker tool and unsoldered the remaining tiny pieces of the connections.... leaving holes to reconnect the new wires I'll add onto.

I figured out the basic wiring "schematic" for the joystick and the attached switch....so I know where to hook up the new things that will get added.  I also now know that the potentiometers are 10.3 K ohms , center tapped, and appear to be a linear taper (as opposed to audio taper).  (The type of taper refers to how the resistance changes along the travel of the pot.)  The center tap serves as the main control function....... going from 0 ohms to 10.3 K ohms across the full movement of the joystick.

So the next test is to get a couple of readily available 10.0K linear pots and hook them up and see if they work.  10.0K pots are common...... 10.3K are not.  I am hoping one of two things:

That the reading of 10.3 K ohms instead of 10.0K was the "tolerance" of the potentiometer (plus or minus X percent).  Or that the 10.3K reading was the inaccuracy of the cheap-ish multimeter that I used to test them.  Additionally..... when the thing is set up it should be possible to calibrate the joystick sensitivity in Windows.... so that should fix the .3K ohms difference.... I hope.  ;)

I have shot pictures of the gamepad insides as I am doing this ......... and close ups of the unmounted circuit board.  I will eventually post annotated pictures and a parts layout diagram here for anyone else following this discussion and trying this conversion themselves.

(BTW... if you are following this thread ....  please post a message and let everyone know that you are.)

So... more later when I try some more things out with this.  Off in search of 10.0K linear slide potentiometers.  ;D


best,

....................john

PS:  This version of the posting was corrected.... the value of the potentiometer is 10.3 K ohms... not 103 K ohms as was previously stated.  My apologies.   :-X
Image ImageIntel i7 960 quad 3.2G LGA 1366, Asus P6X58D Premium, 750W Corsair, 6 gig 1600 DDR3, Spinpoint 1TB 720
User avatar
JBaymore
Global Moderator
Global Moderator
 
Posts: 10020
Joined: Sat May 24, 2003 9:15 am
Location: New Hampshire

Re: Ripping into an Axispad FX joypad (repost)

Postby JBaymore » Wed Oct 22, 2003 11:24 pm

Ripping Into An AxisPad FX Gamepad

I am continuing working on using the Axispad FX gamepad as the basis for a USB "interface card" to utilize the multiple buttons and the double joysticks it contains for mapping to other functions.  (See earlier posts in this thread.)

I now have all the wiring connections soldered in place on the gamepad circuitboard itself.  The next step is to mount the Axispad circuit board onto another piece of perf board for stability, and then to hook the various wires onto connectors that will serve to easily hook up the controls that will be located in the simulated cockpit.

Mechanically these "surface solder connections" are NOT the best and most stable way to connect things.  But this circuit board is double sided ...so drilling a little hole at each solder location is not possible.  So getting the whole thing as rigid as possible as soon as possible is a good idea.

Here in photo #1 is the Axispad FX with the top cover removed before I have done too much to it.  On the right side, the rubberized plastic button covers have been removed showing the copper trace contacts that the conductive material that is on the back side of the rubberized button sheet makes contact with.  It is onto these traces that you need to solder new wires to remote the closure connection out to other buttons located on your panels.

I am not sure what I will be doing with the outputs for the two force feedback vibration motors.  Their use intrigues me.... and I may see what can be done with them.  I have to figure out what command in the sim would cause them to activate.  I expect it will be in the aircraft.cfg file under the force feedback section...... but I don't know anything about that yet.  Any thoughts anyone  ???.  More on that research MUCH later.


Photo #1
Image


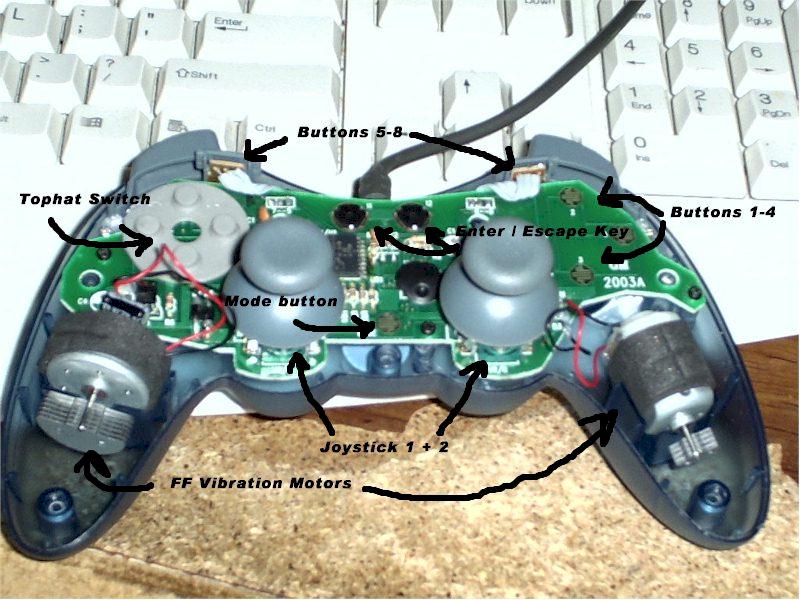
Here below in photo #2 is more of a close-up of the circuit board before I have added new wiring.  The left joystick is already removed.  You can see that some of the switch traces have contacts that are pretty simple to solder onto..... big flat planes of polished copper.  Some however... like buttons 1-4 in the upper right and also the "mode button" in the center bottom...... have little tiny "fingers" of copper traces that intermesh.  These take some really careful work.  On some of them I used an exacto knife and cut some of the "fingers" to make the soldering easier to do.

Some of the buttons activate by bringing the hot side to "ground".  So for these buttons you only need one lead.... and use a common "ground" connection for the other lead.  So that is why you don't see "pairs" of leads coming off each button point on the circuit board.  Some buttons do NOT work this way so they have two leads.  The top hat buttons are like this.... and each "pair" of buttons has a separate second lead.  So if you look close at the last picture, you'll see four red wires on the tophat button section....and only two black wires.

Buttons number 9 and 10 (not seen) seem to have four contact points on the pc board...... but in reality only two of them for each switch are actually connected to anything if you study the traces.  If you look at the last picture... you can clearly see the two wires connected at the diagonal corners of button number 9's position.

On the pot connections where the joysticks used to be, the two end holes on the pc board of each set of three holes see the full 10K ohm constant resistance of the potentiometer.  The center hole is where the variable resistance is "read".  The color coding on the pots is red, black, green wires.....with the black being the center variable connection.


Photo #2
Image


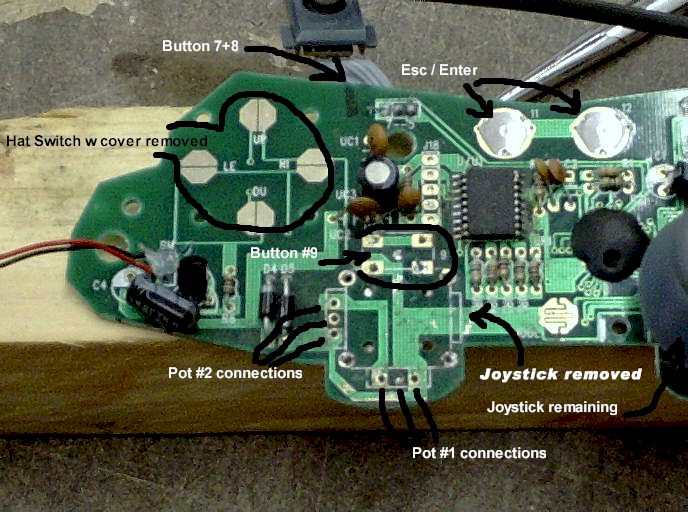
In this last shot all of the added wiring in now soldered into place.  The wires are sort of now grouped into four "sections".  The top left and right are bundles of what will be various control buttons.  The lower left is the two axis connections for one joystick ....which are now really just "analog inputs" onto which I can now attach 10 K potentiometers.  The lower right side is the two axis connections for the other joystick.

In the center bottom is the switch connection for the "mode" button.  The Axispad needs to be set to the analog mode to activate the joysticks.  Haven't figured out how to "bypass" this needed keypress.  So that button will have to be on the "checklist"  ;).  At the top are two buttons for "Escape" and "Enter".  At the moment I don't plan to use them so no wires are soldered onto them.  The USB connector that already came on the gamepad is located in the center top.

You'll also notice that the contact covers on the "enter" and "escape" buttons have been removed in the last picture.  So now they are not really push button switches anymore.  Now they are just little "bullseye" circuit board traces.


Photo #3
Image


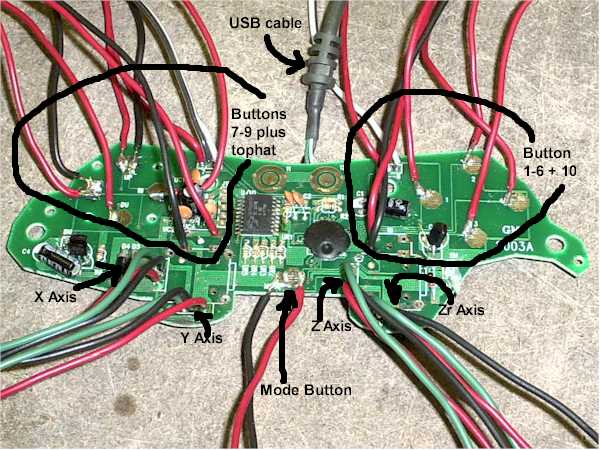
So canibalizing one Axispad FX gamepad gets you 14 buttons and four joystick 10K analog inputs to locate onto a simulated cockpit.

So there you have an update on my work on this conversion so far.  Hopefully these pictures will be useful if you are planning on trying this modification too....or even one sort of like it.  

I'll keep this info coming as it develops.  I'm having fun  so far ;D.


best,

.................john
Image ImageIntel i7 960 quad 3.2G LGA 1366, Asus P6X58D Premium, 750W Corsair, 6 gig 1600 DDR3, Spinpoint 1TB 720
User avatar
JBaymore
Global Moderator
Global Moderator
 
Posts: 10020
Joined: Sat May 24, 2003 9:15 am
Location: New Hampshire

Re: Ripping into an Axispad FX joypad (repost)

Postby JBaymore » Sat Apr 17, 2004 7:54 pm

I have been thinking about how best to use the modified Axispad (s) that I have and I have pretty much decided that I will use three axis controls from one of them for the various trim controls  (rudder, aileron, etc.).

I am working on a design for the trim controls that have a backlit visual gauge indicator of their position.

That still leaves the momentary buttons from each unit.... which likely will be assigned to general "sim" controls".  Fourteen buttons would take care of all the ATC voince commands and then some.  So that might be where they go.

best,

................john
Image ImageIntel i7 960 quad 3.2G LGA 1366, Asus P6X58D Premium, 750W Corsair, 6 gig 1600 DDR3, Spinpoint 1TB 720
User avatar
JBaymore
Global Moderator
Global Moderator
 
Posts: 10020
Joined: Sat May 24, 2003 9:15 am
Location: New Hampshire


Return to Home Cockpits and Setups

Who is online

Users browsing this forum: No registered users and 376 guests