New Forum Survey: Homebrew Cockpits (see below)

Only for Genuine FS fanatics! Taking this hobby from Real to Surreal? Or maybe just combining 4 hobbies into 1 ;)

Re: New Forum Survey: Homebrew Cockpits (see below

Postby JBaymore » Thu Oct 09, 2003 11:40 am

Thanks for your time John.  If I were to link 2 force feedback sticks using usb ports as you described, does that mean they will each perform their "feedback" motions simultaneously?  I do not want that to happen.


Bailey_Girl,

I am not sure.  Never tried .........but I think so.  

If it does,.......... you likely could simulate the "transfer" of control from the captain's sidestick to the first officer's side stick in something like an Airbus 320 cockpit (no yokes) by taking the DC power lead that powers the force feedback of the two sticks and putting them onto a switch.  You'd need a double pole, double throw.  Plus and minus power comes to the common terminals....then switched to eithrer one or the other "throw" positions....which lead to the sticks.  Pushbutton would look more like the real thing on an Airbus.  Rotary would work also.  

Push it to the "Captain" designation and the power is turned off to the first officer's force feedback... and switch it to "First Officer" and the power gets turned off to the captain's ff.  This would not disable the stick itself.... just the force feedback, I think.  Even better if it also disables the stick.

Hope this helps.  If you have two ff sticks...... just connect them and see what happens.  I don't here otherwise I'd try it.  I am interested in this myself... 'cause I want to use that force feedback circuit from the second stick to drive something ELSE  ;).

best,

...................john

PS:  Sorry I responded down here...wanted to keep this "cockpit" stuff together for the moment.
Image ImageIntel i7 960 quad 3.2G LGA 1366, Asus P6X58D Premium, 750W Corsair, 6 gig 1600 DDR3, Spinpoint 1TB 720
User avatar
JBaymore
Global Moderator
Global Moderator
 
Posts: 10020
Joined: Sat May 24, 2003 9:15 am
Location: New Hampshire

Re: New Forum Survey: Homebrew Cockpits (see below

Postby JBaymore » Fri Oct 10, 2003 12:16 pm

First Piece of Cockpit Structure Constructed

I wasn't up to doing any "fussy" wiring type stuff....... and I am waiting for some 10K ohm slide potentiometers to arrive anyway.... so I thought I'd take a couple of hours and tackle the first item for the construction of the cockpit structure itself.

The first section I decided to build for this project is the "shelf" unit that will sit directly behind the center console structure.  All of the design work for the simulated cockpit has been worked out in a CAD program.... so all the dimensional stuff has been resolved there.  Dimensions were lifted directly from that drawing and translated to the real wood parts.

This shelf unit will hold a single "glass cockpit" video monitor at a 15 degree upward angle, will support the right side of the main panel facing tipped at a 15 degree angle, will serve as the support for the glareshield unit that will sit on top of it, and then be topped by one of the exterior display monitors.  The sizing of the various components has been designed so that the center of the exterior view display monitor lines up with my eye level when seated in the pilot's chair.

The monitor located on the middle shelf of this unit will display the engine management instruments.  There is room underneath at the floor leve l to hold two tower style PC's.

It is constructed out of two thicknesses of medium density fiberboard....... 3/4" for the two upright sides..... and 1/2" for the shelves themselves.  The span is so short that I do not think I need a brace under the center of the shelf that holds the monitors.... but if neccessary I will add a piece of 2" x 2" pine across the middle.  Small pieces of pine are used to secure the fiberboard, utilizing screws and glue on all joints.

The holes in the various sections are cut using a standard holesaw in a hand drill.  These are to be utilized as pass-throughs for any necessary wiring.

Photo #1

Image

This shot shows the use of Elmer's Glue in addition to screws for making the structure rigid.  MD fiberboard is weird stuff.  It tends to want to "rip apart" if you put too much stress on it.  The glue helps.  The wood strips are used to allow you to screw into the face of the fiberboard...... not drill into the edges.


Photo #2

Image

Here you can see the center monitor shelf screwed securely to the pine furring strip that has been itself screwed to the side upright piece.  Again, glue was used for all joints.  The narrow board at the botton serves to stabilize the lower rear "legs" of the shelf.  The front does not get any, since PC CPU's will get placed in here.  The center console will locate directly in front of this part too.

Photo #3

Image

Here is one view of the completed first shelf unit.  


Photo #4


Image

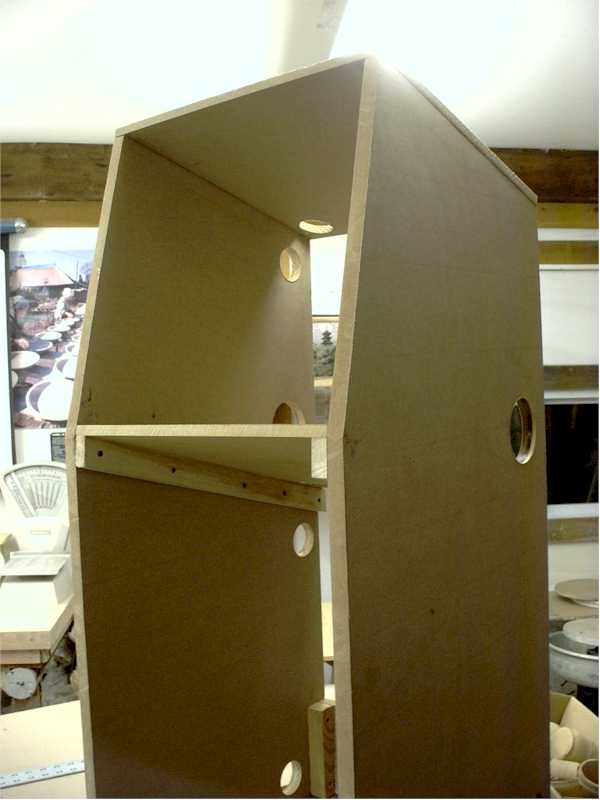
Here is a second view of the same unit.  The location of most holes for the wiring can be seen.

None of this structure will be visible from the cockpit.  It will all be hidden behind the main panel facing, the center console, and the glareshield.

So....... get out your carpentry tools and join me folks  ;).  About $12 USD of wood and screws and glue and 2 hours of time.


best,

................john
Image ImageIntel i7 960 quad 3.2G LGA 1366, Asus P6X58D Premium, 750W Corsair, 6 gig 1600 DDR3, Spinpoint 1TB 720
User avatar
JBaymore
Global Moderator
Global Moderator
 
Posts: 10020
Joined: Sat May 24, 2003 9:15 am
Location: New Hampshire

Re: New Forum Survey: Homebrew Cockpits (see below

Postby Smoke2much » Sat Oct 11, 2003 12:37 pm

Starting to look interesting there John.

Will
Who switched the lights off?
User avatar
Smoke2much
Major
Major
 
Posts: 2755
Joined: Sun Jan 05, 2003 6:33 pm
Location: Sittingbourne, Kent,

Re: New Forum Survey: Homebrew Cockpits (see below

Postby JBaymore » Sat Oct 11, 2003 5:33 pm

Thanks Will.  :)

I may get another couple of hours tonight to tackle starting the next cockpit section.  Next part of the cockpit itself to make is the center console.  That will be a litle more complex... but not much.

The problem is that I am trying to cram in one more VDT down there (  ;) ) in the center console for a FMC or a radar display.  The logical place it should go puts it on the slanted part right next to where the center console butts up against the main panel facing.  But I can't put my hands on something like a 7" or 9" dirt cheap monitor right now.  I've got a small monochrome one that has a 7 3/4" x 10 1/4" screen... in a 11 1/2" x 13" "box".  But that size puts the font edge of the throttle quadrant back about 13" from the panel face.  I am thinking that is a little too far back for comfort for the right arm to conveniently reach it.

The real time consuming stuff with all of this will come when I have to do the wiring for all the switches and stuff.  ;)

You off your night shift thing yet?

best,

....................john
Image ImageIntel i7 960 quad 3.2G LGA 1366, Asus P6X58D Premium, 750W Corsair, 6 gig 1600 DDR3, Spinpoint 1TB 720
User avatar
JBaymore
Global Moderator
Global Moderator
 
Posts: 10020
Joined: Sat May 24, 2003 9:15 am
Location: New Hampshire

Re: New Forum Survey: Homebrew Cockpits (see below

Postby Smoke2much » Sun Oct 12, 2003 2:39 am

You need some cheap flat screen monitors really, but where you get them from I've no idea.  I was sent home sick from my fourth night and have been feeling rank for a few days so at the moment design work has been suspended.  I have made a list of all of the possible key commands and listed them in excel.  I have removed from the list all of those that I want to use an axis for and that don't apply for a cessna (afterburner etc).

Currently the list is 80 functions but this would include a "working Radio" in addition to a console.  I just need an old keyboard now.

Will
Who switched the lights off?
User avatar
Smoke2much
Major
Major
 
Posts: 2755
Joined: Sun Jan 05, 2003 6:33 pm
Location: Sittingbourne, Kent,

Re: New Forum Survey: Homebrew Cockpits (see below

Postby JBaymore » Sun Oct 12, 2003 10:00 am

Construction Started On Cockpit Center Console

I managed to steal about 3 hours last night from 10 PM to 1 AM to get started on constructing the center console portion of my simulated cockpit.
Last edited by JBaymore on Sun Oct 12, 2003 11:05 am, edited 1 time in total.
Image ImageIntel i7 960 quad 3.2G LGA 1366, Asus P6X58D Premium, 750W Corsair, 6 gig 1600 DDR3, Spinpoint 1TB 720
User avatar
JBaymore
Global Moderator
Global Moderator
 
Posts: 10020
Joined: Sat May 24, 2003 9:15 am
Location: New Hampshire

Re: New Forum Survey: Homebrew Cockpits (see below

Postby pete » Sun Oct 12, 2003 10:52 am

Looks pretty amazing John!  :)
Great workspace you have there too ... makes a lot of difference!
Simplicity is the ultimate sophistication. – Leonardo da Vinci
User avatar
pete
Administrator
Administrator
 
Posts: 10224
Joined: Mon Jan 01, 2001 2:01 am
Location: Cloud Cuckoo Land

Re: New Forum Survey: Homebrew Cockpits (see below

Postby JBaymore » Sun Oct 12, 2003 11:17 am

[quote]You need some cheap flat screen monitors really, but where you get them from I've no idea.
Last edited by JBaymore on Sun Oct 12, 2003 11:23 am, edited 1 time in total.
Image ImageIntel i7 960 quad 3.2G LGA 1366, Asus P6X58D Premium, 750W Corsair, 6 gig 1600 DDR3, Spinpoint 1TB 720
User avatar
JBaymore
Global Moderator
Global Moderator
 
Posts: 10020
Joined: Sat May 24, 2003 9:15 am
Location: New Hampshire

Re: New Forum Survey: Homebrew Cockpits (see below

Postby JBaymore » Sun Oct 12, 2003 11:39 am

[quote]Looks pretty amazing John!
Image ImageIntel i7 960 quad 3.2G LGA 1366, Asus P6X58D Premium, 750W Corsair, 6 gig 1600 DDR3, Spinpoint 1TB 720
User avatar
JBaymore
Global Moderator
Global Moderator
 
Posts: 10020
Joined: Sat May 24, 2003 9:15 am
Location: New Hampshire

Re: New Forum Survey: Homebrew Cockpits (see below

Postby JBaymore » Mon Oct 13, 2003 12:42 am

FANTASTIC website for simulated cockpit construction research!

I just came across the following website as I was researching information about general aircraft panel layouts and functions.  I think it is pretty useful for anyone who is looking at building homebrew simulated cockpits.  The wealth of general information it has is wonderful.  It is not heavy on stuff like exact dimensions.... but the breadth of stuff is pretty useful.  It tells you what is located where on the various panels, and what functions thay have... broken down by different aircraft.

Give it a shot at http://www.meriweather.com/flightdeck.html

best,

...................john

PS:  This site would be a good reference for "virtual" cockpit designers also.  Not to mention just generally learning about the instruments for flying the aircraft.
Image ImageIntel i7 960 quad 3.2G LGA 1366, Asus P6X58D Premium, 750W Corsair, 6 gig 1600 DDR3, Spinpoint 1TB 720
User avatar
JBaymore
Global Moderator
Global Moderator
 
Posts: 10020
Joined: Sat May 24, 2003 9:15 am
Location: New Hampshire

Re: New Forum Survey: Homebrew Cockpits (see below

Postby JBaymore » Tue Oct 14, 2003 11:10 pm

First Test of Electrical Control Panels "Look"

Didn't have too much time to devote to this project .... but wanted to do something today.

I noticed in studying real cockpit pictures that one of the important things that gives an aircraft cockpit it's general "look" is the fact that the instruments tend to be all connected with large prominent screw heads,and that they are mostly surface mounted so that they project off the background by about 1/8".
Last edited by JBaymore on Tue Oct 14, 2003 11:16 pm, edited 1 time in total.
Image ImageIntel i7 960 quad 3.2G LGA 1366, Asus P6X58D Premium, 750W Corsair, 6 gig 1600 DDR3, Spinpoint 1TB 720
User avatar
JBaymore
Global Moderator
Global Moderator
 
Posts: 10020
Joined: Sat May 24, 2003 9:15 am
Location: New Hampshire

Re: New Forum Survey: Homebrew Cockpits (see below

Postby JBaymore » Tue Oct 14, 2003 11:18 pm

Great workspace you have there too ... makes a lot of difference!


Pete,

This is what that "aircraft construction" table more typically looks like every day.....
Last edited by JBaymore on Tue Oct 14, 2003 11:21 pm, edited 1 time in total.
Image ImageIntel i7 960 quad 3.2G LGA 1366, Asus P6X58D Premium, 750W Corsair, 6 gig 1600 DDR3, Spinpoint 1TB 720
User avatar
JBaymore
Global Moderator
Global Moderator
 
Posts: 10020
Joined: Sat May 24, 2003 9:15 am
Location: New Hampshire

Re: New Forum Survey: Homebrew Cockpits (see below

Postby JBaymore » Thu Oct 16, 2003 10:26 am

Before you go off screaming at me I would Like to tell you that I did read "Topic: dual sticks, throttles and rudders" and my question is different.

I would like to use the now not obsolete original Wingman and my now "replacement" sick for my "broken" friend of the same brand.

I realized I could fix the rudder problem and now I will have 2 joysticks...If I manage to fix the first.

WHat I would like to do is plug both joysticks at the same time to use in FS not as a CO-pilot thing as mentioned before but more as "extra buttons." THe thing is if I plug both at the same time, both joysticks have the same button assingnment. (eg. If I push either stick foreward, it will move the elevator) what I would like to do is push one stick foreward to move the elevator and one back to do something else, Like trim or something. Maybe like a program or some kind of tweak.

Anyone know of a way I could do that, or if it can be done what would be a good combination. Maybe one controls the plane while the other stick controls the gear flaps and trip. I know its unrealistic but that would kick @$$ kinda like controlling a robor... in a way


Randombeaner,

Hi.

From my experience with Win XP and two of another type of game input device (not Wingman) this should work just fine for you.
Last edited by JBaymore on Thu Oct 16, 2003 10:29 am, edited 1 time in total.
Image ImageIntel i7 960 quad 3.2G LGA 1366, Asus P6X58D Premium, 750W Corsair, 6 gig 1600 DDR3, Spinpoint 1TB 720
User avatar
JBaymore
Global Moderator
Global Moderator
 
Posts: 10020
Joined: Sat May 24, 2003 9:15 am
Location: New Hampshire

Re: New Forum Survey: Homebrew Cockpits (see below

Postby randombeaner » Sat Oct 18, 2003 12:44 pm

ok thanks I didn't know they had diffrent assignments on fs9. THe stick is still in my attick and I havent checked it yet. I'll try it as soon as I can

Thanks
Believe half of what you see, 1/4 of what you hear, and nothing that I say

Image
User avatar
randombeaner
1st Lieutenant
1st Lieutenant
 
Posts: 397
Joined: Wed Apr 16, 2003 9:00 pm
Location: Sothern California, USA

Re: New Forum Survey: Homebrew Cockpits (see below

Postby JBaymore » Sat Oct 18, 2003 5:16 pm

randombeaner,

No problem.

When you do get around to doing it..... please post a note down here in this thread and let us all know how you made out.

If you start making a small "panel"..... send a picture too.

BEst,

....................john
Image ImageIntel i7 960 quad 3.2G LGA 1366, Asus P6X58D Premium, 750W Corsair, 6 gig 1600 DDR3, Spinpoint 1TB 720
User avatar
JBaymore
Global Moderator
Global Moderator
 
Posts: 10020
Joined: Sat May 24, 2003 9:15 am
Location: New Hampshire

PreviousNext

Return to Home Cockpits and Setups

Who is online

Users browsing this forum: No registered users and 182 guests